
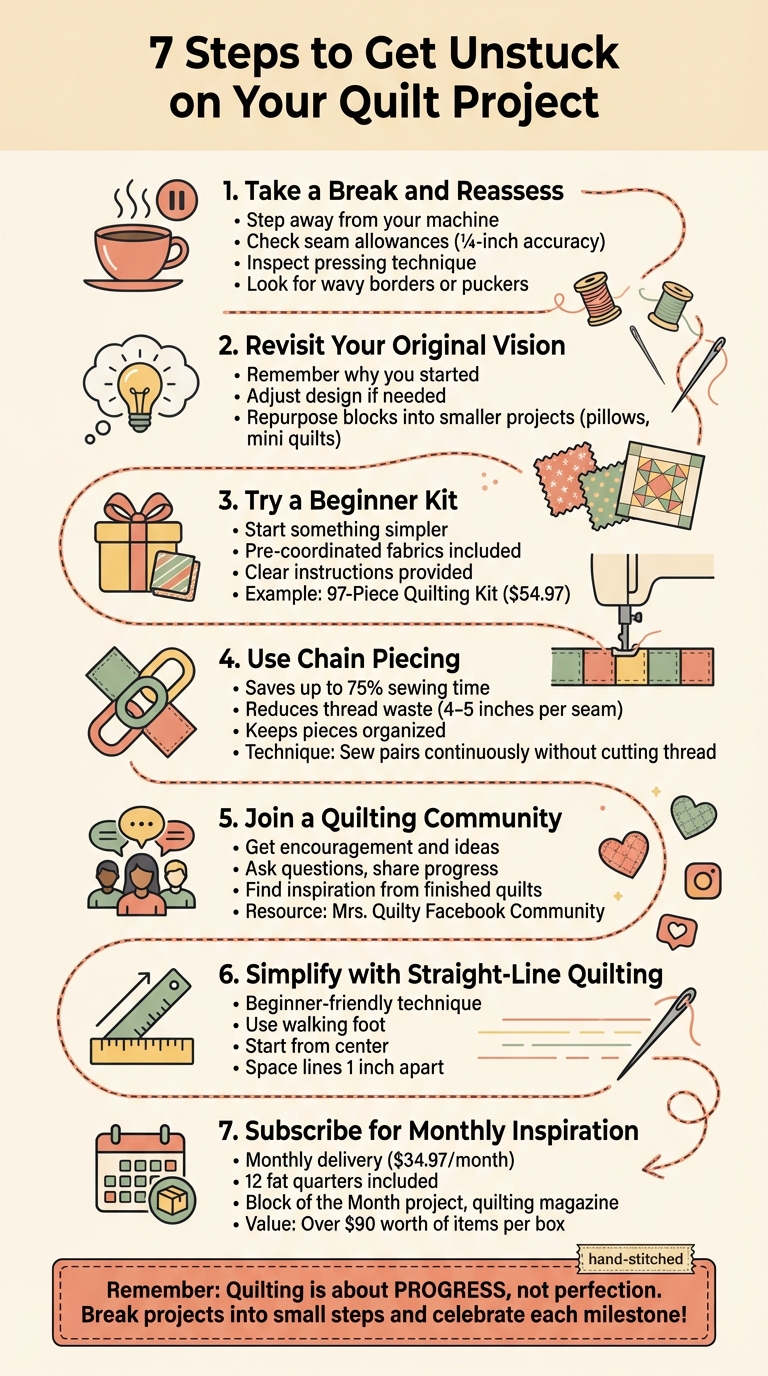
What to Do When You Feel Stuck on a Quilt Project
Feeling stuck on a quilt project is frustrating, but it happens to everyone. Whether it’s technical problems, creative doubts, or feeling overwhelmed by the size of the task, there are ways to move forward. This guide offers practical steps to help you troubleshoot issues, regain motivation, and finish your quilt with confidence.
Let’s break it down step by step so you can get back on track.
Step 1: Take a Break and Reassess
Sometimes stepping away from your sewing machine is the best thing you can do. A short break clears your mind and helps you return with fresh focus. Once you’re ready, take a closer look at the project. Check for technical issues like uneven seams, wavy borders, or stretched fabric. A sharp rotary cutter, accurate seam allowances, and proper pressing can solve many problems.
Step 2: Revisit Your Original Vision
Think back to why you started this quilt. What was your goal? If the design no longer feels right, adjust it. Use new fabrics, tweak the layout, or repurpose unfinished blocks into smaller projects like pillows. Don’t let a stalled project weigh you down - there’s always a way to move forward.
Step 3: Try a Beginner Kit
If you’re feeling overwhelmed, pause your current project and start something simpler. Beginner kits make quilting easier by including pre-coordinated fabrics and clear instructions. Mrs. Quilty offers options like the 97-Piece Quilting Kit ($54.97) or the Plushies Pattern Bundle ($44.97). These projects are perfect for building confidence and rediscovering the joy of sewing.
Step 4: Use Chain Piecing for Faster Sewing
Chain piecing speeds up repetitive tasks by sewing fabric pairs in a continuous chain. This method saves time, reduces thread waste, and keeps your pieces organized. Once sewn, use nesting seams to align rows perfectly. Tools like a quilter’s awl can help keep intersections neat.
Step 5: Join a Quilting Community
Connecting with other quilters can provide encouragement and new ideas. The Mrs. Quilty Facebook Community is a great place to ask questions, share progress, and find inspiration. Members often post photos of their finished quilts, which can spark ideas for your own projects.
Step 6: Simplify with Straight-Line Quilting
When in doubt, stick to straightforward techniques. Straight-line quilting is beginner-friendly and requires minimal tools. Use a walking foot to sew evenly spaced lines, starting from the center of your quilt. This approach is easy to manage and delivers clean results.
Step 7: Subscribe for Monthly Inspiration
The Mrs. Quilty Subscription Box ($34.97/month) delivers pre-coordinated fabrics, patterns, and tools straight to your door. It’s a great way to stay motivated and discover new projects. Each box includes 12 fat quarters, a Block of the Month project, and a quilting magazine, making it easy to start something new without the stress of planning.
Final Thoughts
Quilting isn’t about perfection - it’s about progress. Break your project into small, manageable steps and celebrate each milestone. Whether it’s completing a single block or finishing an entire quilt, every step counts. If you’re ready to dive back in, explore beginner kits or join the Mrs. Quilty community for support and inspiration.
7 Steps to Overcome Quilting Project Blocks
Step 1: Take a Break and Look at What's Wrong
When you're feeling stuck, the best thing you can do is step away from your sewing machine. Sometimes, a little distance is all it takes to gain clarity. Quilter and author Rachel LaBour captures this idea beautifully:
I let this project marinate when I hit a creative block. I ended up somewhere different and better.
Taking a break clears your mind and helps you come back with a fresh perspective.
Check Your Basic Sewing
After your break, it's time to assess the technical side of things. Start by checking your seam allowances - just a small ¼-inch deviation can throw off your entire quilt. Then, look at your pressing technique. If you're sliding the iron back and forth (like ironing clothes) instead of lifting and pressing, you might be stretching your fabric and causing uneven seams.
Take a close look at how your rows or blocks align. Mismatched intersections often mean something went wrong during piecing. Wavy borders? That might be from measuring along the edges instead of the center. Tucks or puckers? Those could be caused by backing misalignment or overly tight tension on your machine. A sharp rotary cutter and properly pressed fabric can help fix many of these issues.
Once you've tackled the technical problems, you can shift your focus back to the creative side.
Remember Why You Started This Project
If the technical side checks out, it might be time to revisit your original vision for the project. Sometimes, losing sight of your design goals can stall your progress. Rachel LaBour, founder of Stitched in Color, shares her perspective:
I tend to focus on the finish as a maker, because a finished, me-made item makes my heart sing. If the finish is so far off, so hard to see, I can't use that carrot to pull myself along.
Think back to what inspired you to start this quilt. What were you hoping to create? Maybe your tastes have shifted, or the fabrics no longer feel like "you." That's okay. Jodi from Tales of Cloth offers this advice:
What were you hoping for? Articulate it. And then, how does this layout fall short?
Once you identify the gap between your vision and reality, you can decide your next steps. Maybe you'll push forward, tweak the design with new fabrics or borders, or even repurpose your blocks into smaller projects like pillows or mini quilts. Life's too short to let an unfinished quilt weigh you down.
sbb-itb-907b860
Step 2: Start Over with a Beginner Kit
When creativity feels stuck, sometimes the best solution is to put your current project on pause and dive into something simpler. A beginner kit offers a fresh start without the stress of designing from scratch. As one experienced quilter puts it:
Quilt kits removed the fabric choice from the quilting equation and allowed me to quickly get to the part I like most – sewing.
With a kit, you skip the time-consuming tasks of selecting matching fabrics and measuring cuts. Instead, you can jump straight into the sewing process, helping you rediscover your quilting flow.
Why Choose Mrs. Quilty Kits?
Mrs. Quilty kits make quilting stress-free by providing pre-coordinated fabrics that eliminate the guesswork. No more running to multiple stores or searching endlessly online for the perfect match. Most kits include everything you need, from essential fabrics to binding, so you can get started right away.
The instructions are designed with beginners in mind, offering clear, step-by-step guidance. This simplicity is a lifesaver for quilters feeling overwhelmed. As one quilter shares:
Sometimes if life is stressful or I have a pretty complicated quilt project under my needle, I need an easy project to clear my head and help me focus.
Tackling a smaller, straightforward project can help rebuild your confidence and give you that satisfying sense of accomplishment. Completing a "small win" like this can make it easier to approach larger, more complex projects down the road.
Kits to Kickstart Your Creativity
Mrs. Quilty offers a variety of kits tailored to different needs:
- 97-Piece Quilting Kit ($54.97): Includes all the essential tools and materials you need to start quilting right away.
- 104-Piece Quilting Set ($64.97): A more comprehensive option packed with everything a beginner could want.
- Plushies Pattern Bundle ($44.97): Features 14 adorable patterns like Timmy the Turtle and Katie the Kitten. These smaller projects are perfect for quick, heartfelt gifts.
- Digital Patterns: Choose from table runners and pot holders ($8.97) or bookmarks ($5.97) for fast, easy wins.
Quilters love these kits for their simplicity and inspiration. Joana L. shared, "I had been losing my quilting mojo after quilting for 3 years. This kit has given me a whole new creative boost😊" Diane M., a beginner, added, "Mrs. Quilty has been a game-changer. The easy projects and clear instructions helped me learn so fast!"
For ongoing creativity, try the monthly subscription box ($34.97/month). It includes 12 coordinated fat quarters, a Block of the Month project, and a quilting magazine - perfect for keeping your creative momentum going while simplifying fabric selection.
Step 3: Use Chain Piecing to Speed Up Sewing
Chain piecing transforms repetitive sewing into a smooth, continuous process, cutting sewing time by as much as 75% compared to traditional methods. Instead of stopping to trim thread after every seam, you sew fabric pairs one after another in a continuous chain, keeping the presser foot down between sets. This approach not only saves time but also conserves up to 4–5 inches of thread per seam while maintaining a consistent 1/4" seam allowance.
How to Chain Piece
To get started, organize your fabric pieces in order next to your sewing machine. Place pairs with their right sides together, ready to feed directly under the presser foot. Use a scrap piece of fabric as a "leader" at the beginning - this protects fabric corners and prevents thread nests.
Sew the first pair of fabric pieces together, but don’t cut the thread when you’re done. Instead, feed the next pair directly behind it, leaving just a small gap of thread between the pairs. Continue this process until all the pairs are sewn into one long chain. Keeping the pieces connected not only maintains their order but also helps prevent accidental fabric flips. For example, sewing 48 half-square triangles took just 18 minutes using this method, compared to over an hour with traditional techniques.
Once your chain-pieced units are ready, the next step is nesting seams to achieve perfectly aligned rows.
How to Nest Seams
After chain piecing, the key to creating straight rows and crisp intersections is nesting your seams. This technique ensures your seams align perfectly when joining rows. To nest seams, press the seam allowance of the top row in one direction and the bottom row in the opposite direction. When the rows come together, the seams "lock" into place, reducing bulk and keeping intersections neat.
As you sew, use a quilter’s awl to hold the intersecting seams steady while they pass under the presser foot. Elaine Theriault, a seasoned teacher and pattern designer, shares her insight:
This is the tool that I've been using for 20 years to get accurate points and intersections. I would be lost without it.
This method eliminates the need for pins, making it easier to keep your blocks aligned without shifting. Start by matching the very beginning of the seam, and then guide the intersections as you sew, rather than relying solely on pins for accuracy.
Step 4: Join the Mrs. Quilty Facebook Community
Feeling stuck on your quilt project? The Mrs. Quilty Facebook Community is your go-to place for advice, encouragement, and fresh ideas. Here, seasoned quilters share tips, troubleshoot tricky designs, and even help transform sewing mishaps into unexpected design features. It's not just about quilting - it's about connecting with others who understand the ups and downs of the craft.
Post Photos and Ask Questions
Don’t hesitate to share photos of your project, no matter where you are in the process. Whether you're struggling with squaring blocks, aligning quilting lines, or mastering a new technique, this community is here to help. As Melissa Tippets from Westalee By Me puts it:
This isn't just a place to show off perfect projects... It's a space to share your struggles, ask for advice, and celebrate all the little victories - even if they're not perfect.
When asking for help, be as specific as possible. For example, explain issues like ruler placement, template combinations, or challenges with a particular technique. You might be surprised - what you thought was a mistake could turn into a unique design element with the community’s input. After solving your own quilting puzzle, take a moment to explore others’ projects to get inspired.
Look at Other Members' Finished Quilts
The community isn’t just about solving problems; it’s also a treasure trove of inspiration. Members regularly post photos of their completed quilts, showcasing everything from bold color choices to intricate textures and techniques. Browsing these finished projects can spark new ideas and help you reimagine your own work. Mary Davis, owner of Mary Go Round Quilts, shares:
People post pictures of completed quilts and projects that can get you excited to try something new. And there's always lots of questions asked on these sites, maybe you can help!
Exploring the gallery can connect you with others tackling similar projects, creating a supportive and collaborative environment for quilters at every stage. Whether you’re looking for fresh ideas or a little motivation, this community has something for everyone.
Step 5: Try a Mrs. Quilty Subscription Box
The Mrs. Quilty subscription box is like a monthly gift for your quilting journey, delivering curated fabrics, patterns, and tools right to your doorstep. It’s designed to reignite your creativity and make quilting easier than ever.
What’s Inside Each Box?
Every box is packed with quilting treasures, including 12 coordinated fat quarters made from 100% premium cotton with exclusive designs. You’ll also receive a Block of the Month project, a full-color quilting magazine with clear, step-by-step instructions, and surprise tools like rulers or thread wraps. Altogether, the box contains over 17 items with a total value exceeding $90.
Your first box is shipped immediately and arrives in just 2–6 days. Shipping within the U.S. is only $4.97 per box, making it an affordable way to keep your projects moving forward. With a 4.8/5 rating from more than 2,000 quilters, this box is a trusted favorite for sparking creativity.
Why Subscription Boxes Simplify Quilting
These boxes take the stress out of quilting by providing pre-coordinated fabric bundles and ready-to-use patterns, so you can skip the time-consuming task of matching materials and dive straight into sewing. When your inspiration feels stuck, having everything at your fingertips can make all the difference.
The Block of the Month feature is perfect for breaking projects into manageable steps. Instead of feeling overwhelmed by a large quilt, you’ll enjoy the satisfaction of completing smaller, bite-sized goals along the way. Plus, the included video tutorials act as a personal quilting coach. As customer Brenda M. shared:
"It's like having a personal quilting coach - right on screen!"
Need more flexibility? You can adjust your subscription to bi-monthly or quarterly deliveries through your account. If you’re not completely satisfied, there’s a 30-day money-back guarantee on your first box. For even more savings, pre-paid plans offer discounts - 3% off for 3 months, 6% off for 6 months, and 9% off for 12 months.
This subscription box is more than just a delivery - it’s a way to re-energize your quilting process with inspiring, hassle-free projects.
Step 6: Stick to Simple Quilting Methods
When you're feeling stuck or overwhelmed, going back to quilting basics can work wonders for your quilting progress. Simple techniques, like straight-line quilting, not only make finishing your quilt easier but also help boost your confidence. You don’t need fancy tools or intricate patterns - just a walking foot and a commitment to keeping things straightforward.
Baste Your Quilt Layers
Before you start quilting, it's important to secure the three layers of your quilt - backing, batting, and quilt top - into a "quilt sandwich." Proper basting keeps everything in place, preventing shifting, puckering, or unnecessary frustration. To ensure full coverage, make sure your backing and batting are 2–4 inches larger than your quilt top on all sides.
Spray basting is a quick and beginner-friendly option. It adheres the layers evenly across the entire surface, minimizing the chance of movement while you sew. You can baste a twin-sized quilt in about 10 minutes. Start by pressing the quilt top and backing to remove any wrinkles. Then, secure the backing to a flat surface using painter’s tape. Spray adhesive onto the fabric in 8-inch sections, working from the center outward, and lightly press with an iron to set the bond.
Pin basting is another dependable method, particularly for larger quilts. Use size 2 curved safety pins, placing them every 3–5 inches (about a hand-width apart). For a twin-sized quilt, you’ll need roughly 100 pins. While this method takes a bit longer than spray basting, it’s simple to remove the pins as you sew.
Quilt Straight Lines from the Middle Outward
With your layers securely basted, straight-line quilting becomes an easy and stress-free process. Equip your sewing machine with a walking foot, which ensures the top and bottom layers feed through evenly, avoiding puckers and shifting. Begin at a center seam to guide your first line of stitching - this eliminates the need to mark the entire quilt.
Always sew in the same direction to prevent rippling, and support the quilt on an extension table or your lap to reduce tension. To keep your lines evenly spaced, attach a guide bar to your walking foot; spacing them about 1 inch apart works well for most projects.
For closely spaced lines, quilt every other line first to distribute the fabric evenly. Once those are done, go back and fill in the remaining lines. This approach helps prevent bunching and ensures your quilt stays smooth. Let the machine’s feed dogs control the pace, and keep a steady rhythm as you sew.
Conclusion
Getting stuck on a quilt project happens to the best of us. Quilter Melissa Tippets puts it perfectly: "Quilting isn't about being perfect - it's about progress, learning, and enjoying the creative process every step of the way." Shifting your mindset from chasing perfection to celebrating small victories can reignite your motivation and keep you moving forward.
Try breaking your project into smaller, achievable goals - like completing two blocks a week or cutting your binding strips. Each small step brings you closer to the finish line. And don’t forget to reward yourself along the way! Whether it’s indulging in a new fat quarter, savoring your favorite treat, or simply taking a moment to admire your work, these little celebrations can boost your confidence and keep the momentum going.
Keep in mind that a finished quilt is always better than one that never gets done. If a project starts to feel more like a chore than a joy, it’s okay to pause, repurpose the blocks, or even start fresh. The Mrs. Quilty community and beginner kits are always here to help you rediscover your creative spark.
As you wrap up this guide, remember: small steps lead to big accomplishments. Feeling inspired to dive back in? Check out our beginner quilt kits for easy-to-follow instructions and pre-cut fabrics, or join the Mrs. Quilty Facebook community to share your progress and connect with other quilters who’ve been right where you are.
FAQs
What can I do to get back on track when my quilt project feels overwhelming?
Feeling stuck on your quilt project? Don’t worry - it happens to the best of us. A quick reset can make a world of difference. Start by stepping away for a bit. Stretch your legs, take a walk, or enjoy a calming cup of tea. Sometimes, a short break is all you need to recharge and clear your mind.
When you're ready to dive back in, try breaking the project into smaller, more manageable steps. Focus on sewing just a few blocks or completing one section at a time. Celebrate each small win - it’s amazing how these little victories can keep your motivation alive.
If the design feels a bit dull, consider switching things up. Experiment with new fabrics, introduce a bold pop of color, or rethink part of the layout. A fresh twist might be just what you need to spark your creativity. Also, take a moment to tidy up your sewing space. An organized area can reduce stress and make it easier to get back into the groove.
And don’t forget - you’re never alone in this journey. The supportive Mrs. Quilty community is always there to offer tips, encouragement, and a helping hand whenever you need it!
What are some easy quilting techniques I can try when I feel stuck?
If you're feeling stuck on your quilting project, don’t worry - sometimes all it takes is a fresh approach to get back on track. One idea is to try hand quilting, which lets you add texture and detail with just a needle, thread, and hoop. Even a simple running stitch or backstitch can bring a lot of character to your quilt, and there’s no need for fancy tools.
Prefer to stick with your sewing machine? Straight-line quilting is a fantastic option, especially for beginners. By sewing parallel rows across your quilt, you can achieve a clean, polished look in no time.
If you're in the mood to experiment, give appliqué a shot. Start with a small shape, like a heart or star, and baste it onto your fabric. Then, secure it with a satin stitch for a fun and decorative touch. Another technique worth exploring is paper piecing, which allows you to create precise designs by sewing fabric onto paper templates.
These methods are straightforward and pair perfectly with the beginner-friendly tools and instructions from Mrs. Quilty. With a little creativity and the right guidance, you’ll be ready to tackle any quilting project, one step at a time!
How can being part of a quilting community help me with project challenges?
Joining a quilting community is like finding a group of friends who truly understand your craft. It’s a space where you can share your struggles, get help with tricky sewing techniques, and discover fresh ideas when you’re feeling stuck. The collective wisdom of fellow quilters can turn even the most frustrating creative block into an opportunity to learn and grow. And let’s be honest - seeing what others are working on often lights a spark of inspiration that gets you excited to dive into your next project.
The Mrs. Quilty Facebook community is one such space, designed to be warm and inviting. Here, you can post your progress, ask for advice, and connect with seasoned quilters who are happy to share their expertise. The group also hosts fun activities like quilt-alongs and monthly challenges, perfect for breaking down big projects into smaller, manageable steps. By becoming a part of this community, you’ll not only gain practical tips and solutions but also the encouragement and confidence to take on any quilting challenge that comes your way.