
What's Next? Upgrading Your Quilting Toolkit After Year One
You've completed your first year of quilting and are ready to refine your tools and skills. Upgrading your quilting toolkit can improve precision, comfort, and efficiency, making advanced projects more manageable. From sharper rotary blades to top ergonomic tools, better equipment ensures cleaner cuts, consistent seams, and less strain during long sessions. Here’s how to review your current setup, identify key upgrades, and take your quilting to the next level.
Why Better Tools Matter
High-quality tools save time and reduce frustration. For example, a 60mm rotary cutter can cut through multiple fabric layers, while ergonomic handles prevent hand strain. Upgraded rulers with non-slip grips improve accuracy, and larger cutting mats provide more workspace. These small changes can make a big difference in your quilting experience.
sbb-itb-907b860
Upgrade Your Sewing and Pressing Setup
Your sewing machine plays a central role in quilting. Adding a 1/4" presser foot helps achieve consistent seams, while a walking foot ensures even feeding of fabric layers. A heavier steam iron and a wool pressing mat can help flatten seams for a polished finish. These upgrades streamline your workflow and improve results.
Don’t Forget Fabric, Batting, and Thread
Using premium materials like long-staple cotton fabric, high-quality batting, and smooth, durable thread enhances the look and durability of your quilts. For example, choosing the right cotton batting offers a classic finish, while polyester resists creasing. Matching thread weight to your project ensures smooth stitching and fewer breaks.
Stay Organized and Maintain Your Tools
Clean and organize your tools regularly to extend their lifespan. Replace rotary blades when they dull, clean your sewing machine after every project, and store tools in a tidy workspace. This ensures your upgraded equipment stays in top condition.
Ready to Upgrade?
Take the next step with curated tools, fabrics, and patterns from Mrs. Quilty. The monthly subscription box ($34.97) delivers everything you need to grow your skills, including exclusive patterns and materials. Explore Mrs. Quilty’s collection and start your next project with confidence.
Review Your Current Tools
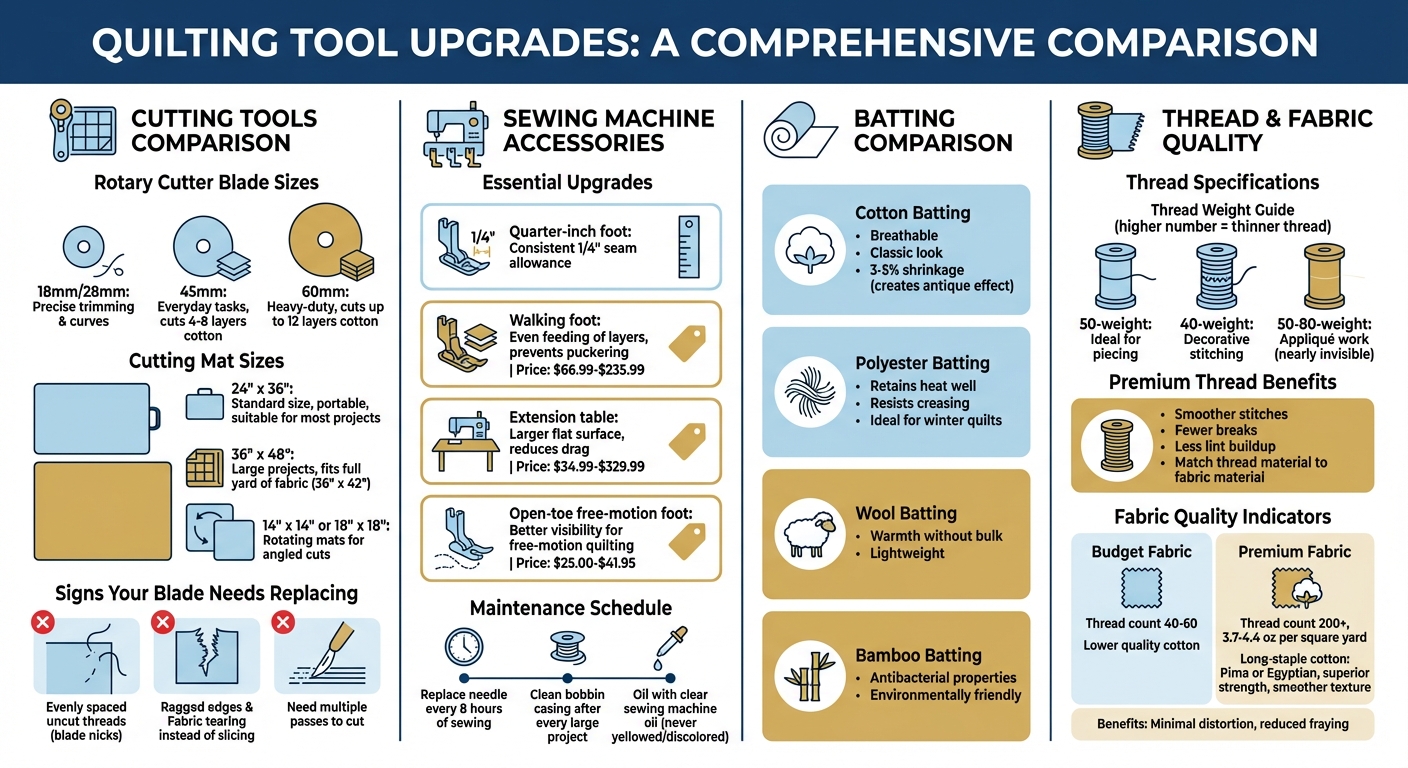
Quilting Tool Upgrade Guide: Essential Equipment Comparison Chart
Taking a close look at your tools can reveal what’s slowing you down and where a smart upgrade could make a real difference. This step ensures you’re investing in items that improve your precision, comfort, and efficiency. Think back to your first quilt with Mrs. Quilty’s guidance and assess your tools with an eye toward meaningful improvements.
Check Your Cutting Tools and Mats
Start with your rotary cutter and blades. A dull blade doesn’t just make cutting harder - it can tear fabric, compromise safety, and ruin precision. Watch for signs like evenly spaced uncut threads (caused by blade nicks), ragged edges, or fabric tearing instead of slicing. To test your blade, try cutting through a folded scrap. If threads skip or you need multiple passes, it’s time for a new blade.
Next, inspect your cutting mat. Over time, heavy use can create deep grooves that reduce resistance, making clean cuts difficult. Also, check your rulers - faded markings or nicked edges can cause your cutter to slip, leading to crooked cuts. To test for accuracy, open a rotary-cut strip to its full width. If you notice a bend in the middle, either your fabric wasn’t square, or your tools shifted during cutting.
Evaluate Your Sewing and Pressing Equipment
Take an honest look at your sewing machine. Are you struggling to maintain a consistent 1/4" seam allowance? Frequent tension issues, skipped stitches, or trouble feeding multiple fabric layers could mean it’s time for a tune-up or some specialized attachments, like a walking foot. Also, don’t forget to replace your needle every 8 hours of sewing to keep stitches consistent.
Now, turn to your pressing tools. If seams won’t lie flat or blocks lose their shape during pressing, your iron might not have enough weight, or you could be overusing steam. A heavier iron that combines heat and weight is crucial for professional-looking results. If your ironing board feels cramped for larger quilt pieces, think about upgrading to a wider surface - it can make a big difference in your workflow.
Make Your Upgrade List
When it’s time to upgrade, focus on tools that show clear signs of wear, like nicked blades, grooved mats, or faded rulers. Next, consider adding specialized tools to your setup, such as a 1/4" presser foot for precise seams or a 60mm rotary cutter capable of slicing through multiple fabric layers. Don’t overlook ergonomics - if wrist or back pain is an issue, an ergonomic rotary cutter or an adjustable workspace can make long sewing sessions much more comfortable. Use this prioritized list to guide your upgrades, and explore Mrs. Quilty’s curated collection of advanced tools to find exactly what you need.
Better Cutting and Measuring Tools
Upgrading your cutting and measuring tools can make a big difference, especially for projects that require precision and intricate details. With better tools, you’ll achieve cleaner cuts and waste less fabric, setting the stage for smoother, more efficient quilting sessions.
Improved Rotary Cutters and Blades
Choosing the right rotary cutter and blade size can transform your cutting experience. A 45mm rotary cutter is great for everyday tasks, cutting through 4 to 8 layers of cotton fabric with ease. But for heavier jobs, a 60mm cutter is a game-changer - it can slice through up to 12 layers of cotton in one go, making it perfect for batting or thicker fabric stacks. On the other hand, smaller blades like 18mm or 28mm are ideal for precise trimming and cutting curves.
Ergonomic handles or squeeze-grip designs are worth considering, as they help reduce hand and wrist strain during extended cutting sessions. Keep your blades sharp - dull blades not only make cutting harder but also increase the risk of accidents. If you notice resistance or skipped threads, it’s time to replace the blade. Look for cutters with safety features like automatic blade retraction, which not only protect you but also speed up your workflow.
Bigger Cutting Mats and Specialty Rulers
A larger self-healing cutting mat can significantly improve your efficiency. A 24″ x 36″ mat is a go-to size for most quilters, offering plenty of room to cut yardage while still being portable. If you’re working on bigger projects or need to fussy cut fabric, a 36″ x 48″ mat allows you to lay out a full yard of quilt-weight cotton (36″ x 42″), giving you a clear view of the fabric’s design before cutting. Self-healing mats are made with a gel-like surface that “heals” after each cut, preserving the mat and keeping your blades sharper for longer.
Specialty rulers are another essential upgrade for quilters aiming for precision. Block square rulers, available in sizes from 2.5″ to 16.5″, help you square up pieces consistently before assembling them. For more complex shapes like triangles, hexagons, or Dresden plates, shaped rulers provide the exact angles you need. Rulers with non-slip grips or textured dots are especially helpful - they stay in place while cutting, ensuring accuracy and safety. For intricate tasks requiring multiple angled cuts, a rotating mat (usually 14″ x 14″ or 18″ x 18″) allows you to rotate the mat instead of the fabric, keeping your cuts precise.
Check out Mrs. Quilty's collection of advanced cutting tools to find the perfect additions to your quilting toolkit.
Improve Your Sewing and Pressing Setup
After a year of quilting, refining your sewing machine accessories and pressing tools can make a noticeable difference in how you work and the results you achieve. These upgrades not only help you work more efficiently but also give your quilts the polished, professional finish that complex patterns require.
Sewing Machine Accessories
Enhancing your sewing machine with a few key accessories can expand its capabilities without the need for a costly upgrade. A quarter-inch foot is a must-have for achieving the consistent 1/4" seam allowance that most quilt patterns call for. Look for models with a built-in metal guide to keep your fabric perfectly aligned while sewing. Before diving into a new project, it’s a good idea to perform a "Quarter Inch Seam Test" to ensure your foot and needle are correctly calibrated.
For quilting layered pieces, a walking foot (also known as an even feed foot) is incredibly helpful. It uses an extra set of feed dogs to guide the top layer of fabric, ensuring all layers feed evenly through the machine. This prevents common issues like shifting, puckering, or uneven seams.
"A walking foot... saves you from the frustration of constantly readjusting or dealing with uneven seams."
Walking feet are priced between $66.99 and $235.99.
An extension table is another excellent addition, providing a larger, flat surface that supports your quilt’s weight, reducing drag and fabric slipping. Prices for these tables range from $34.99 for basic models to $329.99 for more advanced designs. For free-motion quilting, an open-toe free-motion foot offers better visibility and spring action to keep fabric steady as you work. These typically cost between $25.00 and $41.95.
Once your sewing tools are upgraded, it’s time to focus on your pressing setup to ensure your quilt blocks come out perfectly aligned.
Better Pressing Tools
A good pressing setup is just as essential as your sewing tools. A heavy steam iron with reliable heat and steam capabilities is key to flattening seams and aligning quilt blocks accurately. Look for an iron with a high heat setting, a spacious water reservoir, a smooth soleplate, and an auto-shutoff feature for safety. The combination of heat and weight is what ensures seams lie flat, so choose an iron that feels sturdy in your hand.
To strengthen your seams, press directly over them for 2–3 seconds before pressing them to one side or open. This technique locks the stitches into the fabric, creating a stronger seam. Always use a pressing motion (lifting and placing the iron) rather than an ironing motion (sliding) to avoid stretching the fabric or causing puckering.
A wool pressing mat is a fantastic addition to your toolkit. These mats hold heat and provide a stable surface, resulting in flatter, crisper seams. For tackling bulky seams, a tailor's clapper - a simple wooden tool - helps trap heat and moisture, making seams lie flat without needing extra heat. Finally, upgrading to a rectangular quilter’s ironing board gives you a larger, more stable surface for pressing full quilt tops, which is a big improvement over standard narrow ironing boards.
Check out Mrs. Quilty's selection of sewing machine accessories and pressing tools to find the perfect additions for your quilting workspace.
Use Better Fabric, Batting, and Thread
Once you've fine-tuned your tools and workspace, the next step toward crafting quilts with a professional finish is improving the quality of your materials. Upgrading your fabric, batting, and thread can significantly enhance your quilt's look, durability, and overall feel. As you gain experience, you'll notice how different materials behave, making it a great time to invest in options that take your quilting to the next level.
Choose High-Quality Fabrics
The fabric you use can make or break your quilt. Premium quilting fabrics, often made from long-staple cotton like Pima or Egyptian cotton, offer superior strength and a smoother texture compared to standard options. These fabrics are tightly woven with higher thread counts - typically over 200, unlike the 40 to 60 thread count found in budget fabrics. This tighter weave minimizes distortion during piecing and reduces fraying, making your quilting process smoother and your finished product more polished.
Look for labels that specify "long-staple cotton" and aim for a consistent fabric weight - between 3.7 oz and 4.4 oz per square yard - for even wear across your quilt. Precut bundles from Mrs. Quilty ensure not only high-quality materials but also perfectly coordinated colors, saving you time and effort.
Experiment with Different Batting
The batting you choose plays a big role in your quilt's warmth, weight, and texture. Cotton batting is breathable and gives a classic look, though it tends to shrink by 3% to 5% after washing, creating a charmingly puckered, "antique" effect. Polyester batting, on the other hand, retains heat well and resists creasing, making it perfect for cozy winter quilts. If you're looking for warmth without the bulk, wool batting is a great option, while bamboo batting offers antibacterial properties and an environmentally friendly choice.
The loft of your batting also impacts the quilt's appearance. Higher loft creates puffier quilts with more defined quilting lines, while lower loft gives a flatter, smoother finish that highlights your piecing work. To prevent batting fibers from poking through your fabric (a problem known as bearding), choose bleached white batting for light-colored quilts and darker batting for darker projects. Always cut your batting about 8 inches larger than your quilt top to ensure you have enough overhang for proper coverage.
Upgrade Your Thread
Thread quality matters more than you might think. Using better thread results in smoother stitches, fewer breaks, and less lint buildup in your sewing machine. It's best to match your thread material to your fabric - cotton thread pairs perfectly with cotton fabric, ensuring both age and respond to heat in the same way. A 50-weight cotton thread is ideal for piecing, while a heavier 40-weight thread works well for decorative stitching.
Premium threads, like 50-weight Pima cotton, glide effortlessly through fabric and hold up under the tension of washing and use. For appliqué work, finer threads (50- to 80-weight) or silk thread are excellent choices, as they blend seamlessly into the fabric, making stitches nearly invisible. Keep in mind that thread weight numbers are counterintuitive: the higher the number, the thinner the thread.
Elevate your quilting materials with Mrs. Quilty's curated selections, designed to help you create projects that are as durable as they are beautiful.
Build Skills with Patterns, Kits, and Subscriptions
Take your quilting skills to the next level with projects designed to challenge and inspire you. As you move past basic squares and rectangles, techniques like half-square triangles and curved piecing open up new creative opportunities while refining your precision. With the right patterns, kits, and ongoing resources, this journey becomes both manageable and rewarding. These projects not only enhance your skills but also expand your creative toolkit.
Try Intermediate Patterns
Intermediate patterns are a natural next step, building on the fundamentals you’ve already mastered. For example, an Hourglass block takes a simple Four-Patch to the next level with diagonal cuts, creating a more intricate design. These patterns teach you how to handle complex intersections and stress the importance of squaring each block with a 12" x 12" ruler before assembling your quilt top. If you’re tackling curved piecing or appliqué, tools like an 18mm or 28mm rotary cutter make maneuvering around tight curves much easier and more precise.
Why Kits Make Learning Easier
Intermediate patterns are great for improving technique, but kits simplify the process even further by eliminating the guesswork. Pre-planned kits come with fabric bundles that are perfectly coordinated, so you don’t have to worry about matching colors or running out of materials. This allows you to focus entirely on mastering new techniques. Kits often include everything you need - fabric, batting, and detailed instructions that guide you step-by-step. Many even suggest practicing stitches on scrap fabric first, helping you build confidence and avoid costly mistakes.
The Mrs. Quilty Subscription Box
To keep your momentum going, the Mrs. Quilty Subscription Box offers a monthly delivery of curated projects, exclusive patterns, tutorials, and fun extras for $34.97. Each box, valued at over $120, includes a quilting magazine, step-by-step instructions, and all the materials you need to explore new techniques. It’s a hassle-free way to ensure you always have a fresh project ready to start, delivered right to your door. Ready to grow your skills? Check out the subscription at Mrs. Quilty's Subscription Box and take on your next quilting adventure with confidence.
Care for and Organize Your Tools
Once you've invested in upgraded quilting tools, taking care of them properly ensures they last longer and perform better. A little maintenance and organization after each project can save you from unexpected breakdowns and expensive replacements.
Tool Maintenance Basics
Start with your sewing machine - it’s the workhorse of any quilting setup. After every large project or about 8 hours of sewing, clean the bobbin casing and feed dogs. Use a brush or a chenille stem to remove lint from tight spots, but skip the canned air - it only pushes debris deeper into the machine. Always unplug the machine before cleaning, and when oiling, stick with clear sewing machine oil. As National Quilters Circle advises, "If your oil is yellowed or discolored at all, it will cause your machine more harm because it gets gooey and acts more like an adhesive than a lubricant."
Replace your sewing needle every 8 hours of sewing to avoid snags and skipped stitches. For rotary cutters, clean all parts when changing the blade, adding a drop of sewing machine oil to the blade’s center before reassembling. Always store rotary cutters with the blade closed in a cool, dry place. Cutting mats need occasional care too - use a standard eraser to remove lint or wash them gently with mild dish soap and room-temperature water. To avoid warping, store mats flat or hang them from pants hangers. For your iron, clean the soleplate with a dry towel while it’s hot, and clear steam vents with a 50/50 mix of vinegar and water in the reservoir.
Once your tools are in top shape, organizing them will make your quilting sessions smoother and more enjoyable.
Organize Your Workspace
A well-organized workspace helps you work efficiently and keeps your upgraded tools within easy reach. Keep the tools you use most often - like scissors, rotary cutters, and rulers - on your work surface. Store extras like replacement blades and less-used accessories in nearby drawers or cabinets to keep clutter at bay. Group similar items together, such as separating threads by type (piecing, quilting, or embroidery) and storing machine accessories in labeled containers. Hang acrylic rulers on adhesive hooks along the edge of your cutting table for quick access.
For projects in progress, use baskets or keep materials together in labeled plastic bags to stay organized. Free up table space by using vertical storage like pegboards or floating shelves for patterns and frequently used items. Safely dispose of old needles, pins, and rotary blades by placing them in a sturdy container before tossing them out. A tidy, streamlined workspace means less time searching for tools and more time focusing on your craft.
FAQs
What tools should I upgrade to after my first year of quilting?
After your first year of quilting, it’s a great time to invest in tools that bring more precision, durability, and efficiency to your projects. Here’s a list of essentials to consider:
- Rotary cutter: Go for an ergonomic design with a sharp 45 mm blade. It slices through multiple fabric layers with ease, giving you clean, precise cuts every time.
- Self-healing cutting mat: A 24" × 36" mat is ideal for cutting larger pieces. The gridlines help with accuracy while the mat protects your workspace.
- Quilting ruler: A 6" × 24" acrylic ruler with clear markings ensures your measurements are spot-on, making piecing more consistent.
- Sewing machine accessories: Add a quarter-inch foot for perfect seams or a free-motion quilting foot to explore creative stitching designs.
- High-quality thread: Opt for a smooth, strong 50-weight cotton thread. It delivers clean, professional-looking stitches that hold up over time.
- Fabric scissors: Dedicate a sharp pair exclusively to fabric. This keeps your cuts clean and prevents fraying.
- Iron and ironing board: A dependable iron and sturdy board are must-haves for pressing seams flat and giving your quilt a polished, finished appearance.
Upgrading to these tools will make larger projects feel manageable, open the door to new techniques, and enhance the joy of quilting.
How do I take care of my upgraded quilting tools to make them last?
Proper maintenance of your quilting tools ensures they perform well and last for years. After every quilting session, take a moment to clean your tools. Use a soft, dry cloth to gently wipe away lint and fabric fibers from rotary cutters, scissors, and rulers. For your iron, clean the soleplate with a damp cloth while it’s cool, then buff it dry. Store everything in a clean, dry space - keep rotary cutter blades in their sheath, lay cutting mats flat to prevent warping, and store rulers flat to avoid bending or cracking.
Here are some extra care tips for specific tools:
- Rotary cutters: Regularly clean the blade and replace it as soon as it dulls. A sharp blade ensures smooth cuts through multiple fabric layers without snagging.
- Cutting mats: Wipe them with a damp cloth and avoid cutting near the edges to keep the grid lines intact.
- Fabric scissors: After every use, wipe the blades clean and occasionally oil the pivot joint with light machine oil to maintain their smooth operation.
With these simple care habits, your tools will stay in great shape, making quilting easier and more enjoyable!
What fabrics and batting should I use to improve my quilting results?
For quilts that stand the test of time, 100% cotton quilting fabric is your go-to choice. Opt for medium-weight, tightly woven cotton, often labeled as "quilter’s weight." This fabric type resists shrinking and color bleeding, ensuring your quilt maintains its vibrant colors and shape. Pre-washed fabrics with a smooth weave are ideal, as they help create crisp seams and give your quilt a polished, professional finish.
When it comes to batting, it’s all about matching the material and thickness to the quilt’s purpose. Cotton batting is lightweight, breathable, and perfect for everyday quilts. If you’re crafting a quilt for colder weather, polyester batting offers extra warmth, with higher lofts adding a cozy, plush feel. For something lightweight with a soft drape, blends like wool, silk, or bamboo are excellent options. To avoid distortion during assembly, always cut the batting slightly larger than the quilt top - about 2 to 3 inches extra on all sides.
By combining high-quality cotton fabric with the perfect batting, you’ll create quilts that are not only beautiful but also comfortable and built to last.