
Sustainable Quilting: How to Use Every Scrap
Fabric scraps don’t have to go to waste. Quilters can turn leftover pieces into functional, beautiful projects while keeping waste out of landfills. This guide explains how to organize scraps by size, store them efficiently, and use every piece - from large offcuts to tiny trimmings. Whether you’re making quilt blocks, seasonal decorations, or even composting natural fibers, there’s a purpose for every scrap. Let’s explore how to make the most of your fabric stash step by step.
How to Sort and Use Fabric Scraps by Size - Complete Guide
Sorting and Storing Scraps
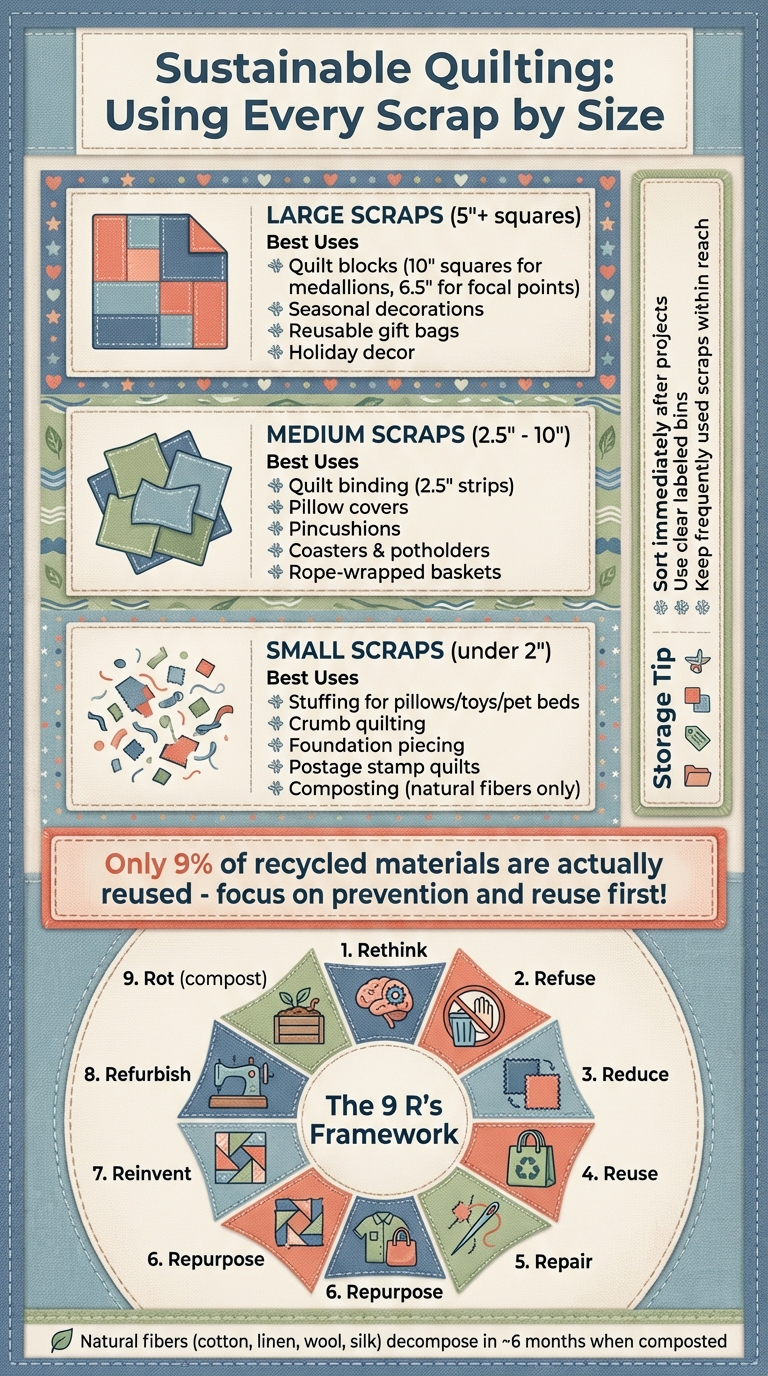
Start by trimming and sorting scraps immediately after finishing a project. Organize by size - 10" squares, 5" squares, 2.5" strips - and optionally by color. Use clear bins for easy visibility and label them to stay organized. Keep frequently used scraps within reach, and when bins fill up, start a project or donate extra pieces.
Projects for Larger Scraps
Larger scraps (5" or bigger) are ideal for quilt blocks and seasonal items. Match scrap sizes to block patterns for minimal waste, or sew smaller pieces together to create larger fabric sheets. Use these for medallion blocks, holiday decor, or reusable gift bags.
Medium-Sized Scraps
Scraps between 2.5" and 10" are perfect for quilt binding, pillow covers, and small crafts. Create scrappy bindings, reversible pillows, or rope-wrapped baskets. Medium scraps also work for pincushions, coasters, and heat-resistant items like potholders.
Small Scraps and Trimmings
Tiny scraps can be used for stuffing pillows, pet beds, or toys. Natural fibers like cotton and wool can also be composted. For creative projects, try crumb quilting, foundation piecing, or postage stamp quilts.
The 9 R’s of Scrap Management
Follow the 9 R’s - Rethink, Refuse, Reduce, Reuse, Repair, Repurpose, Reinvent, Refurbish, and Rot - to manage scraps wisely. For example, reuse selvages for accents, repair worn quilts, and compost natural fibers to enrich soil.
Tools and Patterns for Scrap Projects
Mrs. Quilty offers a monthly subscription box ($34.97) with fabric, patterns, and tutorials for scrap-based projects. Or, download digital patterns ($14.97/month) tailored for scraps of all sizes.
Ready to transform your scraps? Visit the Mrs. Quilty collection for tools and patterns that make quilting waste-free and fun.
How to Sort and Store Your Fabric Scraps
Making the most of your fabric scraps starts with a system that keeps them organized, easy to find, and ready to use. The best time to tackle this is right after finishing a project. By trimming and sorting your scraps immediately, you’ll prevent them from piling up. Start by sorting them by size for a streamlined process.
Sort Scraps by Size
Having a clear method for sorting scraps can save time and spark creativity. Begin by dividing your leftover fabric into size categories. Trim them into standard sizes like 10" squares for blocks, 5" squares for charm details, 2.5" squares, and 2.5" strips.
For even more organization, consider sorting by color within each size. This approach is perfect for pulling together coordinated palettes for seasonal projects or scrap quilts. Some quilters also like to sort by designer or fabric value (light versus dark), especially if they collect specific lines or need backgrounds for appliqué. As a general rule, keep scraps that are at least 2" × 2". Smaller pieces can be used as stuffing or even composted.
Storage Options for Scraps
Once sorted, store your scraps in clear bins to make colors and patterns easy to see without rummaging. Label each bin by size, color, or any other system that works for you to keep things simple and functional.
To prevent scraps from taking over your space, limit storage to a manageable amount. When a bin gets full, either start a scrap-busting project or donate the extras. Protect your scraps from sunlight to avoid fading, and keep frequently used pieces close by in rolling carts or open trays near your sewing machine. This way, they’re always within reach for your next project.
sbb-itb-907b860
Projects for Large Fabric Scraps
If you have fabric scraps measuring 5 inches or larger, you’ve got plenty of creative options. These larger pieces are perfect for quilt blocks that require more fabric, allowing you to craft striking designs without stitching together tiny fragments. To make the most of your scraps, match their size to block patterns that fit, minimizing waste and maximizing your design potential.
Before diving in, measure your scraps and compare them to your pattern’s requirements. For instance, an 8-inch square is great for curved blocks or large triangles, while a 6.5-inch square can serve as a stunning focal point for showcasing a floral print. Once you’ve assessed your scraps, you can explore creative ways to transform them into quilt blocks or seasonal projects.
Making Quilt Blocks from Large Scraps
Large scraps truly shine when used in quilt blocks that need bigger pieces. For example, 10-inch squares are ideal for medallion-style designs, while 6.5-inch squares work well for fussy-cut blocks that highlight intricate prints. Even 4-inch squares can be transformed into Half Square Triangles, making them versatile for various patterns. Chunky blocks and big triangles are especially efficient for using up these larger fabric leftovers.
Keep the scale of your design in mind - larger scraps are best suited for bigger blocks, as this simplifies piecing and enhances your design’s visual impact. If your scraps aren’t a perfect match for standard sizes, consider the “scrapifying” technique. This involves sewing smaller pieces together to create a larger fabric sheet, which you can then cut into the required shapes. This method is particularly useful for modern patterns or nonstandard triangle blocks. Don’t forget to press and trim your scraps to create clean, straight edges, making assembly much easier. Using every bit of fabric not only enhances your project but also supports sustainable quilting practices.
Beyond traditional quilt blocks, large scraps are perfect for festive and seasonal designs.
Seasonal Quilt Projects
Holiday and seasonal projects are a fantastic way to use large scraps, especially when you want to create themed color palettes. Organize your scraps by color - reds and greens for Christmas, oranges and browns for fall, or pastels for spring - and you’ll have a ready-made collection for seasonal crafting. These sorted scraps can be turned into mini quilts, wall hangings, table runners, or decorative pillows that bring a festive touch to your home.
For holiday decor, large scraps can serve as stunning focal points. Use them to create fabric trees, table runners, or even festive wall hangings that celebrate the season. You can also transform 10-inch squares into patchwork drawstring bags - an eco-friendly and reusable option for gift wrapping during the holidays. With just a little creativity, those larger scraps can bring warmth and charm to your seasonal projects.
What to Make with Medium-Sized Scraps
Medium-sized scraps, ranging from 2.5" to 10", are perfect for projects that fall between tiny scraps and larger quilt blocks. They’re incredibly versatile, lending themselves to tasks like quilt binding, pillow covers, and other practical crafts. The trick is to match the scrap size to the right project. For instance, 2.5" strips are great for binding, while 8"–10" squares can transform into pillow covers or reversible blocks. Keeping your scraps sorted by size and pressed ensures you’re always ready for quick, satisfying projects.
Binding Strips and Pillow Covers
Medium scraps shine when turned into quilt binding. Strips at least 2.5" wide can be trimmed to uniform sizes - typically 2.5" or 3" - and sewn together for a scrappy, vibrant binding. For pieces 6" or longer, consider using diagonal seams to create a stronger, more even finish. Straight grain binding works well for rectangular edges, while bias-cut binding is better suited for curves or scalloped designs.
These scraps also work beautifully for pillow covers and home accessories. You can quilt leftover or orphan blocks together with fusible fleece, finishing them with simple binding to create reversible pillow covers. For a creative touch, wrap medium scrap strips around cotton rope and use a wide zigzag stitch to craft decorative bowls, baskets, or coasters. When sewing through multiple layers for rope projects, a denim needle (size 100/16) helps prevent breakage.
From bindings to home decor, medium scraps bring both functionality and creativity to your projects.
Pincushions and Small Crafts
Medium scraps are also perfect for crafting pincushions, which make thoughtful handmade gifts. Scraps in the 4"–8" range can be pieced into patchwork squares, stuffed, and finished into classic square or round pincushions. These small projects are a great way to experiment with color combinations and hone your piecing skills.
Beyond pincushions, medium scraps can be used for coasters, mug rugs, trivets, fabric-covered notebooks, button magnets, or even fabric garlands. For heat-resistant items like potholders or trivets, be sure to use heat-resistant batting. Each of these projects helps you make the most of every scrap, keeping waste to a minimum while embracing the joy of low-waste quilting.
Using Your Smallest Fabric Scraps
Even the tiniest fabric bits - those under 2 inches or the thread trimmings left on your cutting mat - can find a new purpose. Building on methods for using larger and medium-sized scraps, these ideas ensure no piece goes to waste. By matching techniques to the size and type of fabric, you can make the most of every last bit.
Stuffing and Composting Options
Natural fiber scraps are perfect for stuffing items like pillows, pincushions, stuffed toys, pet beds, and even floor poufs. To avoid clumping, cut the smallest trimmings into confetti-sized pieces. A rotary cutter can make quick work of shredding them while keeping your cutting mat intact.
If your scraps are made of 100% natural fibers - such as cotton, linen, wool, or silk - you can add them to your compost bin. Shredding the fabric into smaller pieces helps speed up decomposition, which typically takes about six months in a well-maintained compost pile. Before composting, avoid adding heavily printed areas like t-shirt logos or thick graphics, as some dyes might contain harmful chemicals. Also, skip synthetic materials like polyester or nylon; they won't decompose and could contaminate your compost. Instead, use synthetic scraps for stuffing projects, or repurpose them as nesting material for birds or as colorful, weed-free mulch in your garden.
Mini Quilts and Pieced Backings
Tiny scraps can take on a new life with crumb quilting, a zero-waste approach where irregularly shaped pieces are stitched together to create new fabric. This technique is ideal for making coasters, mini zipper pouches, or small improv blocks about 3.5 inches square. For even smaller pieces, try foundation piecing by sewing thin strips onto machine tape or fusible interfacing to craft stable fabric for borders or bookmarks.
Postage stamp quilts are another option, using squares as small as 1 inch to create intricate, mosaic-like designs. Selvage piecing, on the other hand, transforms the finished edges of fabric into textured panels that work beautifully for bags or mini quilts. You can also combine leftover backing fabric to craft colorful, textured panels, reducing the need for additional yardage.
Mrs. Quilty's digital patterns include several designs tailored for scrap projects, making it easy to turn even the tiniest pieces into finished quilts. To simplify the process, sort your smallest scraps by color. This makes coordinating pieces for scrappy blocks and foundation work much easier. These techniques align with Mrs. Quilty's dedication to zero-waste quilting and sustainable crafting.
The 9 R's of Scrap Management
The 9 R's offer a practical way to cut down on quilting waste. These principles - Rethink, Refuse, Reduce, Reuse, Repair, Repurpose, Reinvent, Refurbish, and Rot - encourage mindful decisions about fabric use. By following them, you can reduce waste while making the most of every scrap in your collection.
Patty Murphy, Founder of Create and Sustain, highlights a startling fact: only 9% of recycled materials are actually reused. This reveals why it's so important to focus on waste prevention and creative reuse rather than relying solely on recycling. Here’s how you can put these principles into action.
How to Apply the 9 R's
Start by rethinking your buying habits. Before purchasing new fabric, check your scrap bins - you might already have what you need for your next project. Refuse disposable items like plastic bags by opting for reusable totes instead. To reduce waste, buy only what’s necessary and cut leftover fabric into standard sizes (like 2.5-inch squares or strips) right after completing a project.
Reuse every bit of fabric, even selvages, which can be turned into ruffles or other accents. Batting scraps? Stitch them together to create "frankenbatting" or use them as stuffing. When quilts or clothing show signs of wear, repair them to extend their life instead of replacing them. Repurpose sentimental items - like old T-shirts, denim, or vintage sheets - into new quilt designs. For damaged vintage quilts, often called "cutter quilts", reinvent them into quilted jackets or home decor pieces.
Refurbish furniture for your sewing area; for example, turn a wooden TV tray into a pressing table. Lastly, rot (compost) natural fibers such as cotton, linen, wool, or silk.
"Essentially, our rule of thumb is that if it was once alive, it can be composted."
Steven Heeley from Our Sustainable Journey explains that natural fibers, when added to a well-maintained compost bin, decompose in about six months. This allows them to enrich the soil instead of piling up in landfills. By embracing these practices, you can ensure every piece of fabric is put to good use, all while contributing to Mrs. Quilty's vision of a more sustainable quilting community.
Mrs. Quilty Kits and Patterns for Scrap Projects
Mrs. Quilty offers a variety of options to turn your fabric leftovers into stunning creations. From complete kits delivered to your door to digital patterns you can download instantly, these resources are designed to help you make the most of every scrap.
What's in the Monthly Subscription Box?
The Mrs. Quilty Subscription Box ($34.97/month) is packed with everything you need for scrap-based quilting projects. Each box includes premium fabrics, exclusive patterns, detailed tutorials, a quilting magazine, and surprise gifts - totaling over $120 in value. The curated materials are thoughtfully selected to showcase the potential of scraps, making it an excellent choice for those who enjoy sustainable quilting. The monthly deliveries encourage a regular quilting routine, while the tutorials help you refine your skills and discover new ways to use your fabric stash. Plus, the subscription is flexible - you can cancel anytime.
Looking for instant inspiration? Check out the digital pattern options below.
Digital Patterns for Scrap Quilts
For those who prefer digital access, the Digital Pattern Subscription ($14.97/month) provides eight exclusive patterns each month, valued at $71. These patterns are tailored for scraps of various sizes, from 2¼" x 4½" to 8" x 7", allowing you to match designs to the fabric you already have. You can also adapt the patterns by sewing smaller pieces together to meet size requirements. Once you download the patterns, they’re yours to keep, so you can start creating immediately and make the most of your fabric scraps.
Conclusion
Sustainable quilting is all about making thoughtful choices that gradually add up to meaningful change. By organizing your scraps after each project, selecting patterns tailored for leftovers, and following the 9 R's framework, you can effortlessly minimize waste while crafting quilts that are truly one of a kind. This approach highlights how reusing and repurposing can often be more impactful than recycling. Let these ideas shape your quilting journey.
A great place to start is by building a simple habit: after finishing a project, sort your fabric scraps by size. Larger pieces can become quilt blocks, medium ones work well for binding or small projects like pillow covers, and the tiniest bits can be used as stuffing or even composted. If you find scraps that no longer suit your style, consider donating them to a local school art program or theater group. Keeping your workspace organized ensures you'll actually use what you save.
For natural fibers like cotton, linen, and wool, composting can be an eco-friendly option. When shredded, these materials can break down and enrich the soil in about six months. Plus, Mrs. Quilty’s digital patterns are designed with scraps in mind, accommodating sizes from 2¼" x 4½" to 8" x 7", so you can easily turn your leftovers into something beautiful.
Each quilting project is a reflection of the quilter, and no two collections of scraps are identical. This means your work will always carry a personal touch. Whether you're assembling a 60x60 size quilt or crafting a small pincushion, seeing every scrap as a resource rather than waste can transform how you create - and that shift in mindset can lead to endless possibilities.
Feeling inspired to make the most of your scraps? Start your waste-free quilting journey today. Check out the quilting supplies collection for tools that simplify scrap management, or dive into scrap-friendly designs with the Digital Pattern Subscription.
FAQs
What’s the best way to organize and store fabric scraps efficiently?
Efficiently managing fabric scraps begins with sorting them in a way that fits your quilting projects. Many quilters like to organize scraps by size - for example, fat quarters (about 18 in × 22 in), fat eighths (about 9 in × 22 in), or smaller pieces suited for charm squares or improv blocks. This approach makes it simple to find the sizes you need for specific patterns while keeping your workspace neat.
After sorting, consider storing your scraps in clear, stackable bins or zip-top bags. Add labels that include the size and the date you added them (e.g., 3/15/2025) to stay organized. Clear containers are great for quickly spotting colors, and labels ensure everything stays in order. For tiny pieces, hanging file folders or a drawer system with dividers work well. These options are handy for sorting scraps by color or theme. Pick a system that suits your space and quilting habits, and make consistent labeling a habit to keep everything in its place!
What are some fun and practical ways to use medium-sized fabric scraps?
Medium-sized fabric scraps, ranging from 4 to 8 inches, are just the right size for practical and fun projects. They’re manageable to work with and help minimize waste, making them a great choice for adding a personal flair to everyday items.
With these scraps, you can craft a quilted needle case, a mini quilt or wall hanging, or even small fabric pouches and coin purses. Looking for something a little out of the box? Try braiding the scraps into fabric twine - perfect for bag handles or decorative straps. Not only do these projects help reduce fabric waste, but they also give you the chance to create one-of-a-kind, eco-conscious pieces that reflect your imagination.
Can I compost fabric scraps made from natural fibers, and how does it work?
Yes, fabric scraps made from natural fibers such as cotton, linen, wool, or silk can often be composted - provided they are 100% natural and free from synthetic blends, dyes, or chemicals. To compost these scraps effectively, cut them into smaller pieces to speed up decomposition and mix them with other organic materials in your compost pile.
Here are a couple of helpful tips for successful composting:
- Avoid fabrics that have been treated with synthetic dyes, coatings, or finishes, as these can slow down or even prevent the breakdown process.
- Maintain a balanced compost by mixing the "brown" fabric scraps with plenty of "green" materials, like fruit and vegetable scraps, to ensure proper decomposition.
After a few months, you’ll have nutrient-rich compost ready to nourish your garden - an easy way to reduce waste while giving back to the environment!