
How to Photograph Your Quilts for Social Media
Quilt photography can feel tricky, but it doesn’t have to be. With just your smartphone and some easy techniques, you can take pictures that highlight your quilt’s colors, textures, and design beautifully. Whether you’re sharing on Instagram or Pinterest, good photos help your work stand out and connect with others in the quilting community. Let’s break down how to set up, light, and frame your shots for the best results.
Start with Natural Light
Natural light is key to making your quilt look its best. Find a spot with bright, indirect light - like near a window or in shaded outdoor areas. Avoid direct sunlight, which can create harsh shadows and distort colors. Early morning or late afternoon often provides the softest, most flattering light.
Prep Your Quilt
Press your quilt to remove wrinkles, especially along fold lines. Use a lint roller to clean up stray threads or dust. If you’re hanging it, make sure it’s straight using painter’s tape, command hooks, or a curtain rod. For floor or bed displays, smooth out the edges and align them with visible guides like floorboards.
Use Your Smartphone
Clean your phone’s camera lens for sharp photos. Turn on grid lines in your settings to keep your quilt straight, and tap the screen to focus on the quilt. Adjust brightness if needed, and always shoot in the highest resolution available. Holding your phone steady or using a tripod can make a big difference in clarity.
Frame Your Shots
Take a mix of full-quilt, close-up, and lifestyle photos. For full-quilt shots, hang or lay the quilt flat and step back to capture the entire piece. Close-ups can focus on stitching, fabric patterns, or binding details. Lifestyle shots show your quilt in use - draped over a chair or bed, for example.
Editing Basics
Editing can enhance your photos without overdoing it. Crop and straighten your images to center the quilt and remove distractions. Adjust brightness, contrast, and white balance to ensure colors look true to life. Apps like Snapseed or Lightroom Mobile are great for fine-tuning.
Share Strategically
On Instagram, vertical images (1,080 × 1,350 pixels) work best for feed posts, while Pinterest favors a 2:3 ratio (1,000 × 1,500 pixels). Use hashtags like #quilting or #quiltsofinstagram to reach a wider audience. Spread out your posts over several days to keep followers engaged.
By following these steps, you can showcase your quilts in a way that highlights all the effort and care you’ve put into them. Ready to try it out? Grab your phone, find some good light, and start snapping!
Setting Up Your Photo Space
Creating the perfect space to photograph your quilt doesn’t require fancy equipment or a professional studio - your home has everything you need. A little preparation goes a long way in making your quilt’s colors and patterns shine. Once your space is ready, focus on lighting, composition, and presentation to capture the best possible shot.
Pick a Location with Good Light
Natural light is your best friend when photographing quilts. Look for bright, indirect light coming from a window, doorway, or shaded outdoor area. A north-facing window or any spot where sunlight doesn’t hit directly works well, as it gives you soft, even light without harsh shadows. Turn off indoor lights to avoid color distortion, and test the light by checking for gentle shadows and true white tones. Many quilters find that late morning or late afternoon provides the perfect balance of brightness without being too intense. If shooting at midday, step back from the window or move into deeper shade to soften the light.
Keep your background simple and neutral to let your quilt take center stage. A plain wall, a solid-colored sheet, a neatly made bed with a neutral cover, or clean hardwood floors all work beautifully. Clear away any clutter or distracting objects. If the room feels visually busy, a large white or light gray sheet can serve as a temporary backdrop. A clean and minimal setup helps your quilt’s colors stand out, making your photos pop on platforms like Instagram and Pinterest while showcasing your quilting style.
Before you start snapping photos, make sure your quilt is in tip-top shape.
Get Your Quilt Ready
A well-prepared quilt makes all the difference in your photos. Start by pressing it thoroughly, paying extra attention to borders and corners. If it’s been folded, iron out any creases along the fold lines - those small wrinkles can be surprisingly noticeable in overhead shots. Use a lint roller or sticky tape to remove stray threads, especially on darker fabrics that highlight every speck.
Once it’s pressed and clean, lay or hang your quilt and ensure it’s perfectly aligned. Use visual guides like the edge of a bed, floorboards, tile lines, or painter’s tape on a wall to square up the corners and straighten the borders. A small "photo kit" with essentials like an iron, lint roller, fabric-safe pins, painter’s tape, and a clean white sheet can save time and make the process smoother.
Display Your Quilt Properly
How you display your quilt can dramatically affect the final photo. For a straight-on shot, hang the quilt using painter’s tape or command hooks. Lightweight quilts can be secured with wide painter’s tape along the top edge or back corners - it holds well and peels off cleanly. For heavier quilts, try command hooks paired with a dowel or curtain rod, draping the quilt over it for support. To prevent sagging, use small binder clips or skirt hangers spaced every 8–12 inches along the top edge. Doors can also work as a backdrop - just hang the quilt over the top using a rod or over-the-door hooks, ensuring the door stays steady while you shoot.
If you’re laying your quilt on a bed or floor, smooth it out from the center toward the edges. Make sure the top edge aligns with the headboard or floorboards for a polished look. On floors, vacuum or sweep beforehand, and consider placing a clean sheet underneath to keep the quilt spotless. For outdoor shots, avoid placing your quilt directly on damp grass or dirty surfaces. Use something clean, like a blanket or waterproof mat, underneath and crop it out of the frame later. Always smooth out wrinkles before snapping each shot and check that the corners are lying flat. Take a moment to ensure the quilt looks rectangular and centered in the frame - it’s worth the extra effort for a professional-looking result.
Camera Equipment and Tools You'll Need
Now that your photo space is ready, it's time to focus on your equipment. You don't need a fancy camera to capture the details of your quilt - your smartphone, paired with a few affordable tools, can do the job beautifully. The secret lies in making the most of what you already have and adding a couple of extras to enhance sharpness and consistency.
Taking Photos with Your Smartphone
Your smartphone's rear camera is your best option since it offers higher resolution and better optics than the front-facing one. Before you start, clean the lens with a microfiber cloth to ensure there’s no smudging or haziness that could affect your photos. Adjust your phone settings to the highest resolution and quality to capture all the intricate details of your quilting. Avoid any "storage saver" modes, as they can compromise image quality.
Enable grid lines in your camera settings to keep your quilt straight and avoid any distortion. When shooting, tap on the quilt to focus, and adjust the exposure by sliding your finger up or down - this ensures bright areas don’t wash out and darker fabrics retain their texture. If your phone has an HDR mode, turn it on to balance highlights and shadows effectively.
Hold your phone steady using both hands, with your elbows tucked in for stability, and press the shutter gently. For overhead shots, make sure your phone is parallel to the quilt surface to avoid warped edges. Using features like a self-timer or voice-activated shutter can also help minimize camera shake. Always take several photos from the same angle to increase your chances of capturing a crisp, sharp image.
Once you've mastered these techniques, you can elevate your setup with a few simple accessories.
Accessories for Sharper Photos
To step up your photography game, consider investing in a tripod with a phone clamp. These are affordable, usually priced between $15 and $30, and they provide stability for sharper images while ensuring consistent framing. For flat-lay shots, position the tripod about 6–10 feet away from a throw-sized quilt and adjust the height to center the camera on the quilt’s middle. For overhead shots, raise the tripod so your phone is 4–6 feet above the quilt and perfectly aligned straight down.
Lighting is another key factor. Reflectors can make a big difference without breaking the bank. A simple white foam board from a Dollar Store, costing around $1.25–$2.00, works just as well as professional photographic reflectors. Place it opposite your light source, such as a window, to bounce light onto darker areas of your quilt, softening shadows and evening out the exposure.
If natural light isn’t an option - say, during evening hours or in winter - consider adding a ring light (priced between $25 and $80) or an LED softbox lighting kit (typically $60–$150). These tools provide steady, adjustable lighting, making it easier to achieve well-lit, professional-looking photos regardless of the time or weather conditions.
With these simple tools and techniques, you’ll be well-equipped to showcase your quilting projects in their best light.
How to Frame and Compose Your Shots
Once your equipment is set and lighting is just right, it’s time to focus on framing your quilt for the perfect shot. By thoughtfully composing full, detail, and context shots, you can showcase your craftsmanship in ways that truly stand out. Let’s dive into how these approaches can elevate your quilt photography.
Full Quilt and Overhead Shots
Capturing the entire quilt in a single frame allows viewers to appreciate its design and color palette at a glance. To achieve this, hang the quilt flat on a wall or lay it on a clean floor. Step back far enough to include the entire quilt with a minimal border, and use grid lines on your camera or phone to ensure the shot is straight.
Position your camera directly opposite the quilt, keeping it parallel and centered. For overhead shots, use a step stool or ladder to shoot straight down, avoiding distortions like keystoning. Taking multiple shots from the same position increases your chances of getting a sharp, well-aligned image.
If space is limited or you’re looking for a creative twist, try the “swirl” or “twist” technique. Lay the quilt flat, grab the center, and rotate it slightly to create folds and texture. Then, shoot directly down near the center for a dynamic and visually interesting result. This method is especially handy for fitting larger quilts into smaller spaces.
Detail Shots of Stitching and Fabric
Detail shots bring attention to the intricate work that sets your quilt apart. Focus on stitching, fabric patterns, or binding details by zooming in on specific areas. Use your phone’s tap-to-focus feature for precision, and set the resolution to at least 2,400 pixels to ensure clarity.
Lighting plays a key role here. Side lighting is ideal for showcasing texture, as it creates soft shadows that emphasize the stitching and fabric depth. Position a light source, like a lamp or a window, to one side of the quilt for this effect. For a flatter, more vibrant look that highlights color and piecing, opt for front lighting to minimize shadows.
Fill the frame with a single quilt block, a fabric motif, or close-up quilting lines. These shots not only highlight your craftsmanship but also give viewers a chance to admire the finer details of your work. Don’t be afraid to experiment with angles to add more personality to your photos.
Different Angles and Settings
Adding variety to your shots through unique angles and settings can tell a richer story about your quilt. For example, shooting from a low angle - close to the ground and angled slightly upward - creates a sense of drama and scale that flat shots can’t achieve. This technique works particularly well for outdoor settings.
Lifestyle shots, on the other hand, show your quilt in use. Drape it over a bed, sofa, or chair, or take it outside for a more natural setting. Shooting outdoors? Stick to overcast conditions or open shade to avoid harsh shadows and maintain true colors. Direct sunlight can wash out details and create unwanted highlights.
Regardless of the setting, keep the background simple and uncluttered so the quilt remains the star of the shot. Pay attention to straight lines in the background - walls, door frames, or horizons should be level. Capture both vertical and horizontal orientations to suit different platforms: vertical shots work great for Instagram’s 4:5 ratio, while horizontal ones are perfect for Pinterest’s wider formats.
With these techniques, you can showcase your quilt from every angle, ensuring your craftsmanship shines in every photo.
sbb-itb-907b860
Getting the Lighting Right
Lighting can make or break your quilt photos. The right setup highlights your quilt's colors, textures, and stitching, while poor lighting can dull its beauty and obscure your hard work. Natural light is your best ally, offering soft, even illumination without the strange color tints that artificial bulbs often create.
Working with Natural Light
Natural light provides the truest representation of your quilt’s colors and patterns. To make the most of it, place your quilt near a window and turn off any indoor lights. The best times to shoot are early morning or late afternoon when sunlight is naturally diffused. These periods give you soft, flattering light that enhances details without casting harsh shadows or creating overexposed areas.
Cloudy days are also ideal for capturing quilt photos, as the overcast sky acts like a giant diffuser, evenly spreading light and reducing glare. If you're shooting outdoors, seek out open shade - like under a porch, an awning, or the north side of a building. This keeps the light soft and even, avoiding the harsh contrasts of direct sunlight.
When positioning your quilt, ensure the sunlight hits it from the front rather than the back. Front-lighting keeps the quilt’s colors vibrant and prevents the top from looking too bright or washed out. If the balance still feels off, adjust the angle of the quilt until the lighting looks even. These natural light techniques are a great foundation for tackling common lighting challenges.
Fixing Common Lighting Problems
Even with natural light, you might encounter issues like shadows, bright spots, or uneven colors. Dark shadows can hide quilting details, but you can fix this by repositioning the quilt or yourself to get more balanced light. A simple white foam board is a handy tool - it bounces light into shadowed areas and brightens corners that might otherwise look dull.
Bright spots or glare are another common problem, especially when direct sunlight or a bright window hits your quilt. Moving the quilt into shade or adjusting your shooting angle can help. Indoors, a sheer curtain over the window can soften the light, eliminating those distracting bright spots that wash out your fabric’s colors.
Timing is everything when it comes to lighting. Early morning, late afternoon, or the golden hour - just before sunset - offers the most flattering light. If you’re working with limited natural light during winter, try planning your photo sessions for weekends or days when you have better daylight. And remember, great lighting often matters more than an expensive camera. A smartphone in good natural light can produce stunning quilt photos, perfect for social media or sharing with friends.
Editing Your Photos for Social Media
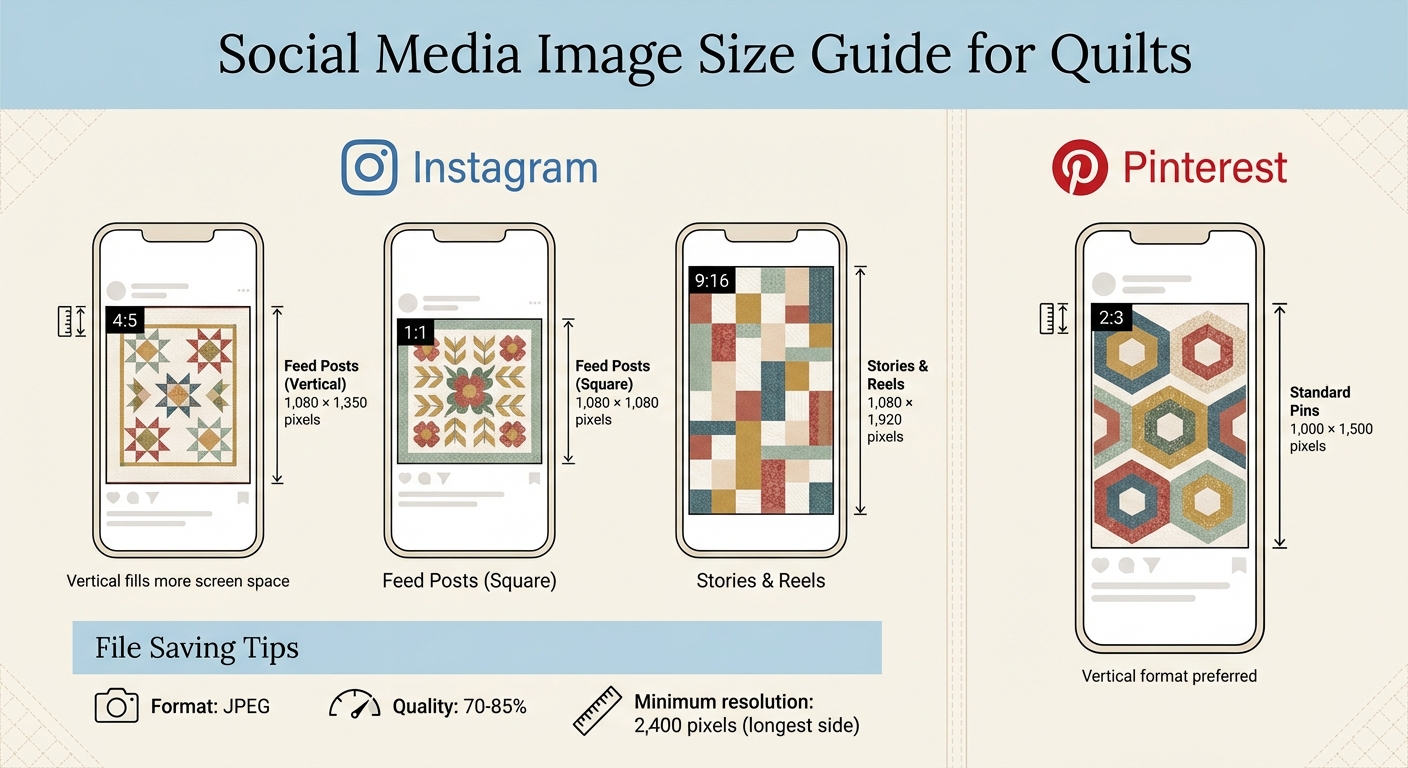
Social Media Image Size Guide for Quilt Photography
Giving your quilt photos a little editing love can make them stand out on Instagram and Pinterest. The goal is to showcase accurate colors, sharp stitching, and an overall polished appearance. The good news? You don’t need fancy tools or expert skills - just a simple process to highlight your work.
Basic Photo Adjustments
Start by cropping and straightening your photo so the quilt takes center stage, and any distractions in the background are gone. Use your editing app’s straightening tool to align the quilt edges neatly with the frame. Then, adjust the exposure and brightness - light fabrics should appear clean and bright without losing detail, while darker sections should still show quilting lines and texture.
Boost contrast slightly to help the patchwork patterns stand out, creating a clear separation between light and dark fabrics. For color accuracy, fine-tune the white balance by selecting a neutral white or gray area in your photo. If whites look too orange, cool the temperature; if they’re too blue, warm it up. Compare the edited photo to your quilt in natural daylight to ensure the colors - like reds, turquoises, and light prints - match what you see in person.
To enhance the texture of your stitching, add a touch of clarity or sharpening, but avoid overdoing it - too much can make the image look harsh. Apps like Snapseed, Lightroom Mobile, or even built-in phone editors are perfect for tweaking exposure, contrast, and clarity. If you use presets, keep them subtle (around 30–60% strength) to maintain the natural look of your fabrics.
Finally, resize your image to fit each social media platform’s specific dimensions.
Sizing Photos for Different Platforms
Once your photo is edited, it’s time to size it for the platform you’re posting on. Each platform has its own preferred dimensions to ensure your quilts look clear and sharp.
For Instagram feed posts, a vertical 4:5 aspect ratio (1,080 × 1,350 pixels) works best. This format fills more of the phone screen, making your quilt the star. Square images (1:1, or 1,080 × 1,080 pixels) are ideal for showing off block stacks or folded quilts, while horizontal images can appear smaller on mobile screens. For Instagram Stories and Reels covers, go with a 9:16 vertical format (1,080 × 1,920 pixels) and keep the focal point centered to avoid buttons or text overlapping your quilt.
Pinterest prefers vertical images, too. A 2:3 aspect ratio (1,000 × 1,500 pixels) is ideal for standard pins. This taller format not only looks great in feeds but also keeps quilt details - like fabric prints and quilting patterns - sharp when viewers zoom in. Save your files as JPEGs with 70–85% quality to balance clarity and file size, ensuring quick uploads and smooth viewing on mobile devices.
Start Sharing Your Quilt Photos
When preparing to share your quilt photos, aim for a resolution of at least 2,400 pixels on the longest side. Label each file with clear, searchable names like "Modern-Star-Quilt-full" or "Log-Cabin-detail-binding" to make them easy to find and identify. For each quilt, create 2–3 types of images: a full quilt shot, a close-up detail, and a lifestyle image. Keep these organized in folders named after the quilt and the platform where you'll share them.
Once your photos are ready, plan your sharing strategy. Instead of posting all your images at once, spread them out over time to keep your audience engaged. For instance, post a full quilt image on Day 1, a close-up of the quilting texture on Day 3, a lifestyle shot (like the quilt on a bed) on Day 5, and a detail of the binding or backing on Day 7. This staggered approach showcases the quilt's design and craftsmanship while keeping your feed fresh and interesting.
When writing captions, include the quilt or pattern name and highlight a few unique details or challenges you encountered. Add a question like, "Would you quilt this with straight lines or free-motion?" to encourage interaction. Briefly mention your process to give followers some behind-the-scenes insight, but keep it short and engaging.
Use a mix of broad hashtags (like #quilting, #modernquilting, #quiltsofinstagram) and more specific ones (such as #logcabinquilt, #handquilting). Stick to 8–15 hashtags to keep things clear and relevant. If you used patterns or fabrics from specific designers or brands, tag them - they often reshare posts, which can help introduce your work to a wider audience.
To stay consistent, batch your photography and editing sessions, and aim to post 1–3 times a week. Remember, sharing regularly is more important than waiting for everything to be perfect. Consistency builds connections and grows your quilting community!
FAQs
How can I make sure my quilt's colors look true to life in photos?
To capture your quilt's colors just right in photos, aim to take pictures in natural, indirect daylight. This type of lighting minimizes harsh shadows and avoids the color distortion caused by artificial lights. For the background, stick to something neutral, like plain white or gray, to keep the spotlight on your quilt without any distracting hues.
Make sure your camera or phone is set to its highest quality settings. Adjust the white balance to match the lighting conditions for a more accurate color representation. Take several photos from different angles and experiment with lighting and positioning. These small adjustments can help highlight your quilt's true colors and intricate details beautifully!
What are the best settings on my smartphone to take great photos of my quilts?
To take beautiful photos of your quilt using your smartphone, start by turning on gridlines. These help you align and frame your shot perfectly. Stick to the standard 1x photo mode for the sharpest results, and skip using digital zoom - it can make your image look blurry. Ensure your quilt is well-lit by using natural light or soft, diffused lighting for even illumination. Tap your screen to focus on the quilt, and adjust the exposure if needed to make the image brighter. Lastly, set your phone to its highest resolution for maximum detail. These simple tweaks can bring out the vibrant colors and intricate details of your quilt!
What’s the best background to use when photographing my quilt?
When photographing your quilt, the background plays a huge role in making your design shine. Opt for neutral tones like white, beige, or light gray. These colors create a clean canvas that highlights your quilt's colors and patterns without overwhelming them. Steer clear of busy or heavily patterned backdrops, as they can pull attention away from your work.
Looking to add a bit of texture or charm? Consider using a wooden table, a plain wall, or even a simple fabric as your backdrop. Natural lighting can make a big difference, so try to shoot near a window or head outdoors for soft, even light. Lastly, keep the area tidy and free of distractions - this ensures your quilt remains the star of the shot.