
How to Plan Your First Quilted Gift
Handmade quilts are heartfelt gifts that bring warmth and meaning to any occasion. Whether you're preparing for a baby shower, wedding, or holiday, quilting allows you to create something personal and long-lasting. Mrs. Quilty makes this process simple for beginners with curated kits, step-by-step instructions, and tools to help you craft gifts with confidence. Let’s explore how to start quilting, from selecting fabrics to presenting the final piece.
How Do You Pick the Right Quilted Gift?
Think about the recipient and the event. For baby showers, small items like bibs or burp cloths are practical and quick to make. For weddings, consider home decor quilts in the couple’s preferred colors. Lap-sized quilts or T-shirt quilts are ideal for graduations or birthdays. Choose a project that fits your skills by selecting the right quilting techniques and matches the recipient’s lifestyle.
What Size Should You Start With?
Begin with manageable projects like baby quilts, table runners, or pillow covers. These are easier to complete and help you build confidence. Avoid overly detailed designs if you’re new to quilting. Mrs. Quilty’s kits are labeled by skill level - Beginner, Confident Beginner, or Intermediate - so you can choose a project that suits your experience.
sbb-itb-907b860
What Tools and Materials Do You Need?
Mrs. Quilty’s beginner kits include everything you need: pre-cut fabrics, patterns, tools, and video tutorials. Essential tools include a rotary cutter, acrylic ruler, and heat-erasable fabric marker. Kits start at $54.97 for a 97-piece set, making it easy to get started without sourcing materials separately.
How Much Does a Quilt Cost?
The cost of a small quilt ranges from $40 to $80, depending on fabric and tools. Mrs. Quilty’s subscription boxes, priced at $34.97 per month, provide over $120 worth of materials, including 12 coordinated fat quarters and exclusive patterns. Investing in a kit simplifies the process and saves time.
How Do You Plan Your Timeline?
Work backward from your deadline. For instance, a baby quilt due June 15, 2026, might need 1–2 days for finishing touches, 2–4 days for quilting, and 3–5 days for piecing and squaring blocks. Break the project into daily tasks to stay on track. Simpler projects can be completed in 2–4 weeks, while more complex ones may take months.
How Do You Choose Fabrics and Colors?
For beginners, 100% quilting cotton is the easiest fabric to work with. Use pre-coordinated fat quarters to save time. When selecting colors, start with a multi-colored “hero fabric” and build your palette around it. Balance bold prints with solids or tone-on-tone fabrics for contrast. Adding sentimental fabrics, like pieces from a loved one’s clothing, makes the quilt even more personal.
How Do You Finish and Present Your Quilt?
Once your quilt is complete, trim threads, wash it in cold water, and tumble dry on low heat to achieve a soft, crinkled look. Add a label with details like the recipient’s name, the date, and the occasion. Present your quilt folded with a ribbon, or place it in a basket with cozy extras like candles or slippers. Include a care card with washing instructions to ensure the quilt stays in great condition.
Ready to Start Quilting?
Mrs. Quilty’s beginner-friendly kits make it easy to create your first quilted gift. With curated materials, clear instructions, and online tutorials, you’ll have everything you need to craft a meaningful keepsake. Explore the kits today and start your quilting journey with confidence.
Selecting a Project for Your Recipient
Pairing Projects with Events
When creating a personalized quilted gift, think about how it aligns with the recipient's celebration and how they'll use it. The best projects are those that match the occasion and provide practical value. For baby showers, smaller, functional items like bibs, burp cloths, or 15″ x 18″ doll quilts are perfect choices. For weddings, consider the couple's home decor or ask about their color preferences to ensure your quilt becomes a treasured part of their space, not something stored away.
For graduations or birthdays, lap-sized quilts or T-shirt quilts are great options. They’re easy to transport to dorm rooms or small apartments. If you’re attending a dinner party or other gathering, hostess gifts like quilted beverage bags, potholders, or tea towels are thoughtful and don’t require knowing precise measurements for their home. As S, Author/Quilter, Fabric and Flowers, wisely says:
When planning a quilt for someone, a crucial part of the final pattern choice for me is how much it will be appreciated... and how it is likely to be used.
Before you begin, also think about the scale and complexity of the project to ensure it fits both your skills and your recipient’s needs.
Choosing the Right Size and Difficulty
Don’t assume that smaller projects are always easier. A small pouch with intricate details can take more time than a simpler table runner. If you’re just starting out, go for manageable projects like a small baby quilt, table runners, or pillow covers. These are great confidence-builders and can be completed quickly.
Also, keep your recipient’s lifestyle in mind. For someone always on the go, darker fabrics and durable backings like fleece are a smart choice - they stand up to wear and require less frequent washing. And if your recipient isn’t into sewing, avoid overly complex appliqué designs. Instead, focus on functional pieces they’ll use and appreciate daily.
How Mrs. Quilty Kits Simplify Your Decision
Mrs. Quilty makes it easier to choose the right project by offering kits tailored to different skill levels and occasions. Each kit is clearly marked - "Beginner" for simple projects like Katie the Kitten plushie, "Confident Beginner" for a Valentine's quilt, or "Intermediate" for more detailed items like table runners. This labeling helps you select a project you can complete on time without feeling overwhelmed.
Every kit includes full-size templates, easy-to-follow instructions, and free step-by-step video tutorials to guide you through the process, almost like having a personal quilting coach. One happy customer, Lychelle M., shared:
I LOVE that these patterns enable me to try a new hobby without being overwhelmed!
With over 65,000 satisfied customers and a stellar 4.8/5 rating from 2,032 reviews, Mrs. Quilty kits save you the hassle of gathering materials from multiple sources. Instead, you can focus on crafting a heartfelt gift that’s both thoughtful and memorable.
Creating Your Timeline and Budget
Quilted Gift Planning Timeline: From Start to Finish
Working Backward from Your Event Date
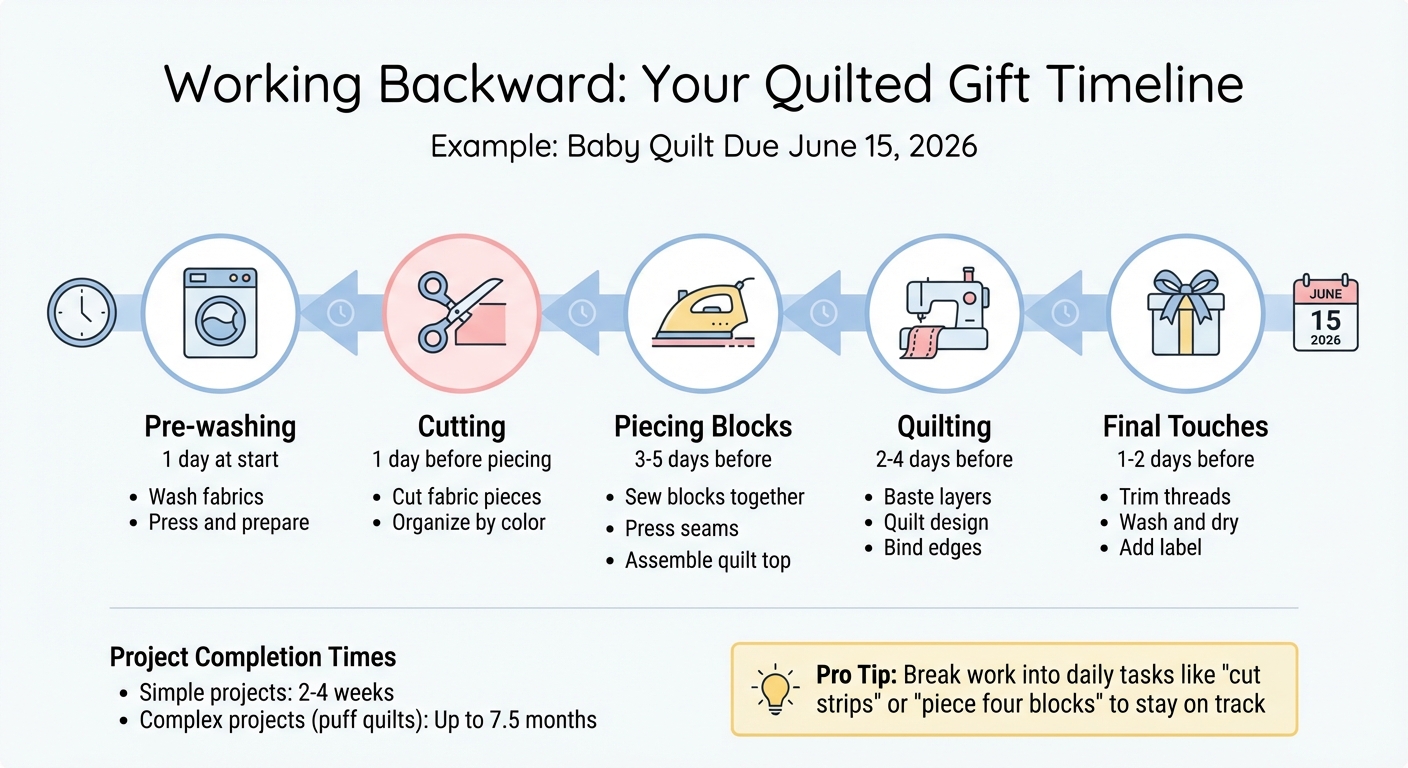
To ensure your quilt is ready on time, start by marking your deadline and work backward to plan each stage. For example, if you’re making a baby quilt due on June 15, 2026, set aside 1–2 days for final touches, 2–4 days for quilting, 3–5 days for piecing blocks, and an additional day each for cutting and pre-washing. Simpler projects can often be completed within 2–4 weeks if you break the work into manageable daily tasks like "cut strips" or "piece four blocks." For more intricate projects, such as puff quilts, you might need up to 7.5 months.
Lisa Donnelly, a contributor to Diary of a Quilter, offers this piece of advice:
Doing just one small thing each day makes a huge difference in moving you toward your goals!
Don’t forget to factor in vacations, appointments, and other commitments when planning your timeline. This way, you’ll have a realistic view of your available quilting time. Once your schedule is set, it’s time to focus on budgeting.
Estimating Costs for Your Quilt
The cost of making a baby quilt typically ranges from $40 to $80, depending on the fabric quality and whether you already own essential tools. Fabric is often the biggest expense, as it covers the quilt top, backing, binding, and batting. Coordinated fat quarter bundles (12–16 pieces) cost between $34.97 and $39.99, while beginner kits - complete with fabric, patterns, and tools - start at $54.97 for a 97-piece set or $64.97 for a 104-piece set.
If you’re starting from scratch, plan for additional tools such as:
- Non-slip acrylic ruler set: Around $45
- Mini iron: About $30
- Fabric markers (8-pack): Around $13
- Sewing machine LED lamp: Around $19
You’ll also need extra fabric - about 1/4 yard per type - to maintain pattern consistency. For the finishing touches, budget for thread, bobbins, a seam ripper tool, safety pins for basting, and optional extras like custom labels or gift bags.
How Mrs. Quilty Saves You Time and Money
Mrs. Quilty kits take the hassle out of quilting, especially for beginners. Instead of hunting for matching fabrics, threads, and patterns, you get everything bundled together in a curated package. Kits are tailored to your skill level - Beginner, Confident Beginner, or Intermediate - so you’ll know exactly what to expect before diving in.
For $34.97 per month, the subscription box delivers over $120 in retail value, including 12 coordinated fat quarters, an exclusive pattern, step-by-step video tutorials, a quilting magazine, and useful tools. Your first box ships right away and arrives in 2–6 days, making it a great option for those working on a tight timeline. Just like a well-planned schedule and budget, Mrs. Quilty’s kits simplify the quilting process, allowing you to focus on the joy of creating a heartfelt gift without the stress of sourcing supplies.
Picking Fabrics, Colors, and Personal Touches
Choosing the right fabrics and colors is one of the most enjoyable and creative parts of quilting. It’s where your quilt starts to take on a personality that reflects your heartfelt intentions.
Fabric Selection for Beginners
If you’re just starting out, 100% quilting cotton is your best bet. It’s stable, easy to work with, and ensures your quilt will stand the test of time. For an effortless design, consider pre-coordinated fat quarters - they save you the hassle of matching colors and cut down on prep time.
For a cozier touch, like a baby quilt or a winter throw, flannel is a fantastic option. Just keep in mind that flannel tends to shrink more, so pre-washing is a must. When it comes to making your quilt visually striking, focus on contrast. A mix of light, medium, and dark tones will keep your design from looking flat. A quick trick to check contrast is the phone camera test: take a photo of your fabrics and apply a black-and-white filter. If everything looks the same shade, you’ll need to mix in more variety.
Also, think about the scale of prints. Small-scale prints work beautifully for smaller quilt blocks, while larger prints shine on borders or as quilt backs. Once your fabric is sorted, it’s time to dive into color selection.
Choosing Colors for Different Occasions
Colors can set the mood of your quilt. Warm tones like reds, yellows, and oranges bring energy and liveliness - perfect for bright, active spaces. On the flip side, cool tones such as blues and greens create a calming vibe, making them ideal for bedrooms or relaxation areas.
An easy way to build a color palette is to start with a hero fabric - a multi-colored print that speaks to the recipient’s taste. Use the colors in the print as your guide. You can even check the selvage edge of the fabric, where small colored dots represent all the hues used in the design, giving you a ready-made palette.
Balance bold prints with solids or tone-on-tone fabrics (often called blenders) to give the eye some rest. Feeling adventurous? Throw in a surprising "zinger" color - just a hint of contrast can make your design pop. For an extra layer of meaning, incorporate sentimental textiles like fabric from a cherished dress, a child’s outgrown clothes, or even a loved one’s work shirts. These touches make the quilt uniquely personal.
Making Your Quilt Personal
Once your fabrics and colors are set, it’s time to add those little details that make your quilt unforgettable.
Start with a quilt label to preserve the story behind your gift. Include details like your name, the recipient’s name, the date (e.g., “June 2025”), and the occasion - whether it’s a birthday, baby shower, or housewarming. You can go a step further by adding an embroidered monogram for an elegant touch. Use a permanent-ink fabric pen for writing - fine-point pens (size 01, 0.25 mm) are great for delicate text, while larger points (size 05, 0.45 mm) work well for bolder lettering. To make writing easier, attach freezer paper (shiny side down) to the back of the fabric to create a stable surface.
Want to take it up a notch? Add embroidered messages. Whether you use hand embroidery, free-motion machine stitching, or a sewing machine’s alphabet feature, these little notes can make your quilt even more meaningful.
Finally, include a care card with washing instructions like “wash cold, tumble dry low” to help the recipient keep their gift looking its best. If you have leftover fabric, use it to sew a matching drawstring gift bag for a thoughtful presentation. Brittany, Founder of Lo & Behold Stitchery, captures it perfectly:
I treasure that label and how it makes an already personal gift even more personal.
Completing and Presenting Your Quilt
Wrap up your quilt with thoughtful finishing touches and present it in a way that makes it an unforgettable gift.
Final Steps for a Polished Finish
Carefully trim any stray threads and inspect every corner for a neat appearance. A quick roll with a lint roller will give it that extra clean look. Before gifting, wash your quilt on a gentle, cold cycle with a small amount of detergent and color catchers. Tumble dry on low heat to set its final texture. As Brittany, Founder of Lo & Behold Stitchery, advises:
Washing the quilt in advance also lets the quilt crinkle, so the recipient won't worry they accidentally ruined the quilt.
This initial wash not only gives the quilt its cozy, crinkled look but also ensures that all seams are secure and everything holds up as intended.
Don't forget the finishing touch: a quilt label. Use a blind stitch to attach a label that includes details like your name, the recipient's name, the date, location, and occasion. This small addition transforms your quilt into a meaningful keepsake, connecting it to a story that will be cherished for years.
Once your quilt is complete, think about how to present it in a way that enhances its sentimental value.
How to Present a Handmade Quilt
For a simple yet elegant presentation, fold or roll the quilt and tie it with a fabric ribbon. Want to go the extra mile? Try the "pocket fold" technique, which creates a built-in pocket perfect for tucking in a care card, a favorite book, or a heartfelt note.
If you'd like to make the gift even more special, consider placing the quilt in a basket with a few cozy extras like a candle or a pair of slippers. Shipping the quilt? Vacuum-pack it to save on postage, then place the sealed package in a handmade drawstring bag crafted from leftover fabric scraps. This thoughtful touch not only protects the quilt but also adds a charming "bonus" gift. As Nicole, Founder of Sew Much Moore, beautifully puts it:
Gifting a handmade quilt is like giving someone a hug that keeps on hugging them.
Encourage the recipient to use and enjoy the quilt. A simple note like, "This quilt was made to be loved and used every day", can reassure them that it’s not too delicate for regular use.
Finally, include a care card to ensure the quilt remains a treasured item for years to come.
Creating a Care Card
A care card is a thoughtful addition that makes maintaining the quilt simple and stress-free. Include clear instructions, such as: "Machine wash cold on a gentle cycle, tumble dry low." Mention using color catchers for the first few washes and suggest spot cleaning for minor stains.
Add extra tips like keeping the quilt out of direct sunlight to prevent fading and occasionally rolling or refolding it to avoid permanent creases. Elizabeth Chappell, Quilt Pattern Designer, highlights the importance of this small gesture:
A Quilt Care card acts as a way of letting people know how to wash their quilt, a cute way to present the gift, AND a place to write a personalized message on the back.
Use the back of the card to share a personal note about why you made this quilt for them. These final thoughtful details reflect the care and love you’ve poured into your quilting journey, making it a gift that truly speaks from the heart.
FAQs
How can I pick a quilt design that suits the recipient’s style and needs?
Choosing the right quilt design starts with thinking about the recipient’s tastes and the space where it will be displayed or used. Consider their favorite colors, patterns, and the overall vibe of the room. For a calm, understated look, stick with soft tones and simple geometric designs. If they lean toward a bold and lively style, explore vibrant colors, eye-catching prints, or modern patchwork patterns.
The quilt’s purpose is just as important. For everyday use, prioritize durability with machine quilting and straightforward designs that can handle regular wear and tear. On the other hand, decorative quilts or gifts for special occasions can showcase more intricate features, such as hand-stitched details or appliqué, since they won’t endure heavy use. By tailoring the quilt to their style, the intended use, and the occasion, you’ll craft a thoughtful, one-of-a-kind gift they’ll treasure.
What are some practical tips for managing your time while quilting?
Managing your time well while quilting can turn your projects into a more enjoyable and relaxing experience. A good starting point is to create a simple tracker to keep tabs on your works-in-progress (WIPs). Break each project into smaller, bite-sized steps, which makes tackling them feel less overwhelming. You can also group similar tasks - like cutting fabric or piecing blocks - to keep your workflow smoother and more efficient.
Take advantage of spare moments in your day for quick tasks, such as sewing a single block or preparing materials for your next step. Keeping your sewing space organized and gathering all your supplies ahead of time can help you avoid unnecessary interruptions. Above all, set achievable goals, take breaks when needed, and focus on enjoying the process. Quilting should be as soothing as it is rewarding!
How can I make my quilt gift more personal and meaningful?
To give your quilt a one-of-a-kind charm, think about adding personal touches such as decorative appliqué, hand-stitched accents, or even a custom monogram. The premium cotton fabrics and exclusive patterns included in your Mrs. Quilty box are perfect for achieving a polished and heartfelt look. These thoughtful details can turn your quilt into a treasured keepsake, making it perfect for any special occasion.